Window 清理dns緩存
步驟很簡單:
- WIN +R 输入cmd
- 执行 ipconfig /flushdns 回车键。
總結為: win +R &cmd & ipconfig /flushdns
Mac 清理dns缓存
打开终端控制台:
sudo dscacheutil -flushcache; sudo killall -HUP mDNSResponder總結:清理舊的cache,殺死dns進程
步驟很簡單:
總結為: win +R &cmd & ipconfig /flushdns
打开终端控制台:
sudo dscacheutil -flushcache; sudo killall -HUP mDNSResponder總結:清理舊的cache,殺死dns進程
簡述:在目前存在的內網穿透的開源系統中,比如:nps、frps。 這兩者都是golang寫的高併發場景下穩定性均比較主流。兩者都有自己的管理後台,可以方便的查看系統的服務狀態,兩者均需要中間服務器。
本文主要講解的是frp。
frp是一款高性能的反向代理應用,專注於內網穿透。 它支持多種協議,包括TCP、UDP、HTTP、HTTPS等,並且具備P2P通信功能。 可以安全,便捷地將內網服務暴露到公網,通過擁有的公望IP節點進行中轉。
cd /usr/local/src/
wget https://github.com/fatedier/frp/releases/download/v0.64.0/frp_0.64.0_linux_amd64.tar.gz
tar -zxvf frp_0.64.0_linux_amd64.tar.gz openwrt上的frp有服務端和客戶端,在openwrt的後台,導航到【服務】->【frp內網穿透】,建立與服務器端的通信。做如下配置:
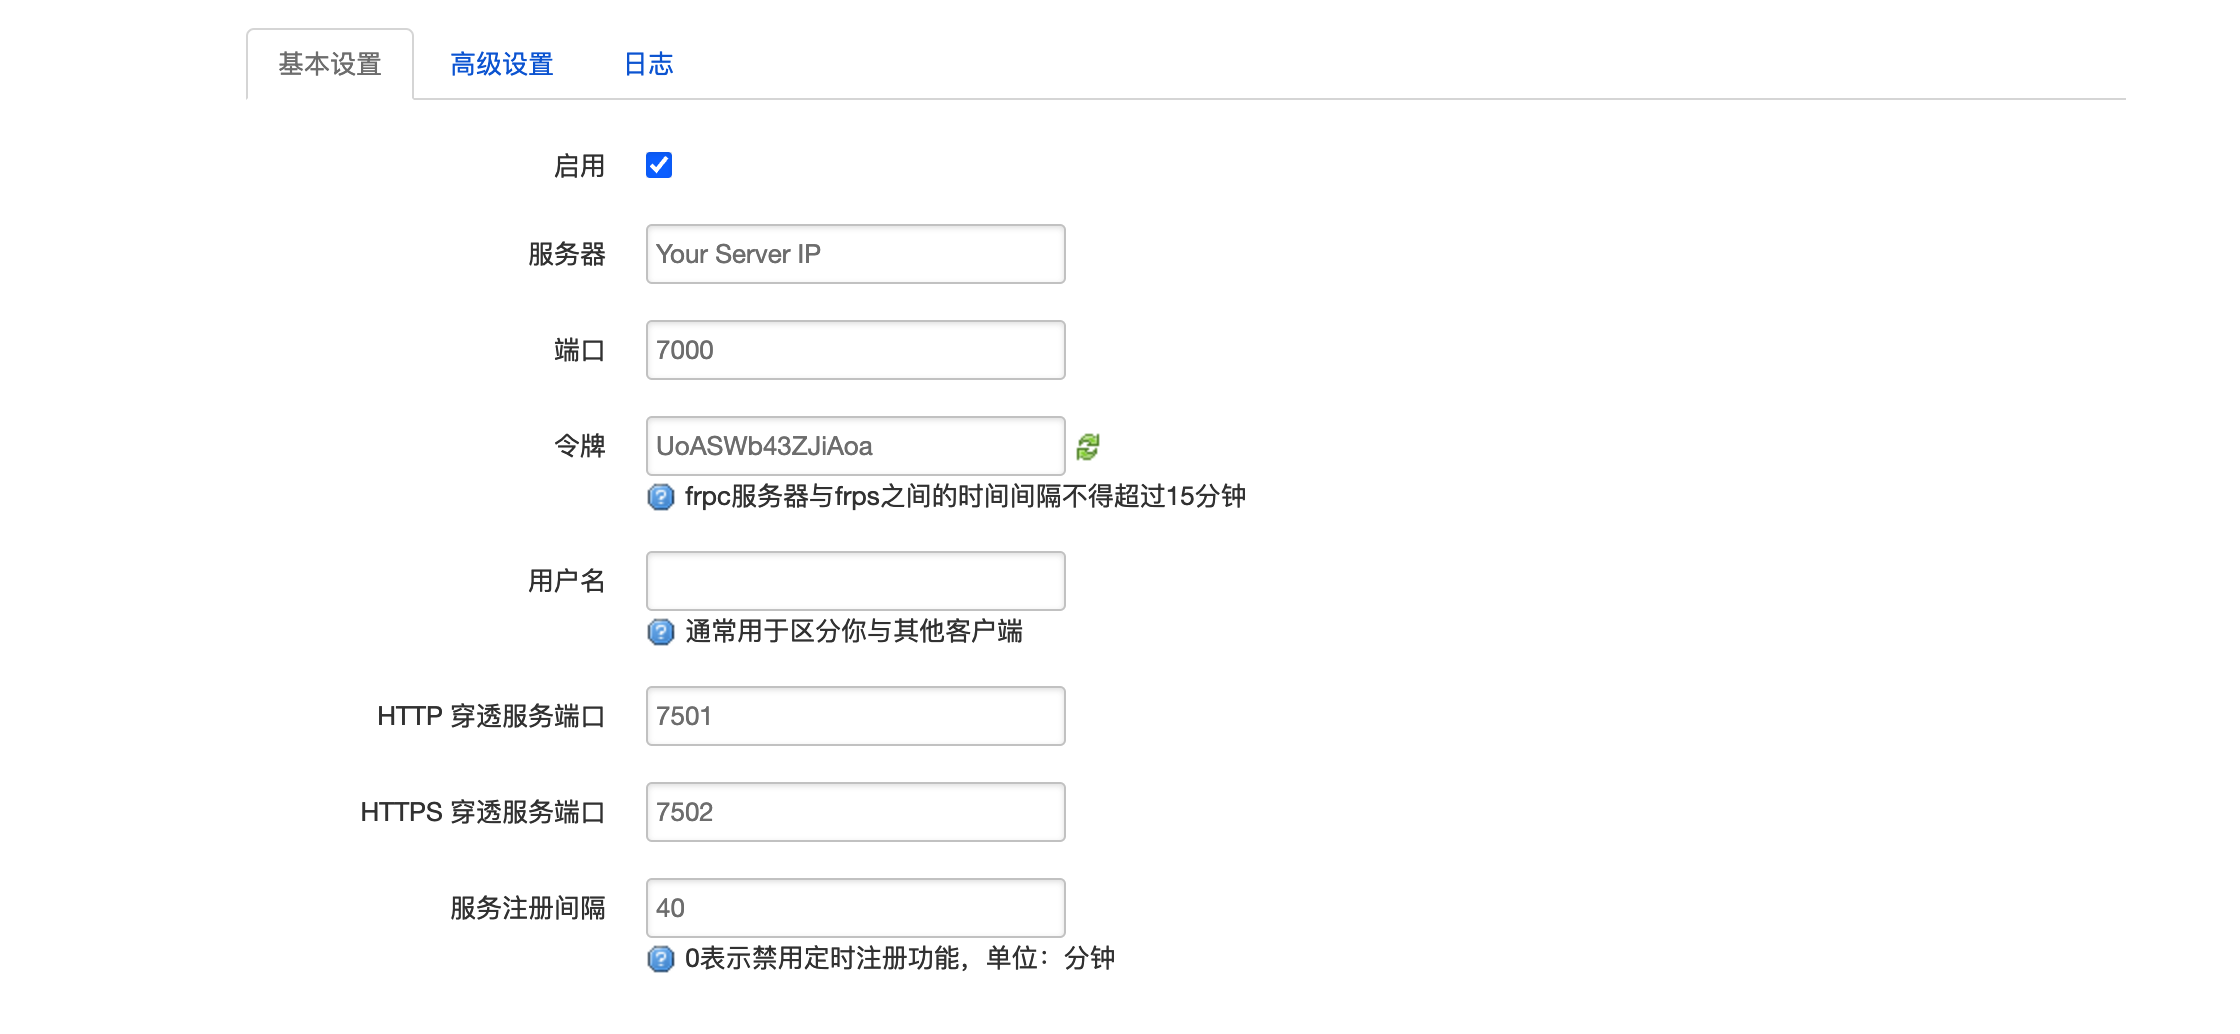
HTTP內網穿透端口和HTTPS的內網穿透端口7501/7502建議填寫服務器端可以使用的端口。 保存以後,服務器端的frps會打印日誌,現在目前是服務器端與客戶端成功的建立了內網傳圖的隧道,想要通過服務器的某個端口訪問Openwrt下的主機,還需要進一步配置。
在下方的【服務列表】,點擊【添加】增加一個端口訪問配置,配置如下圖:
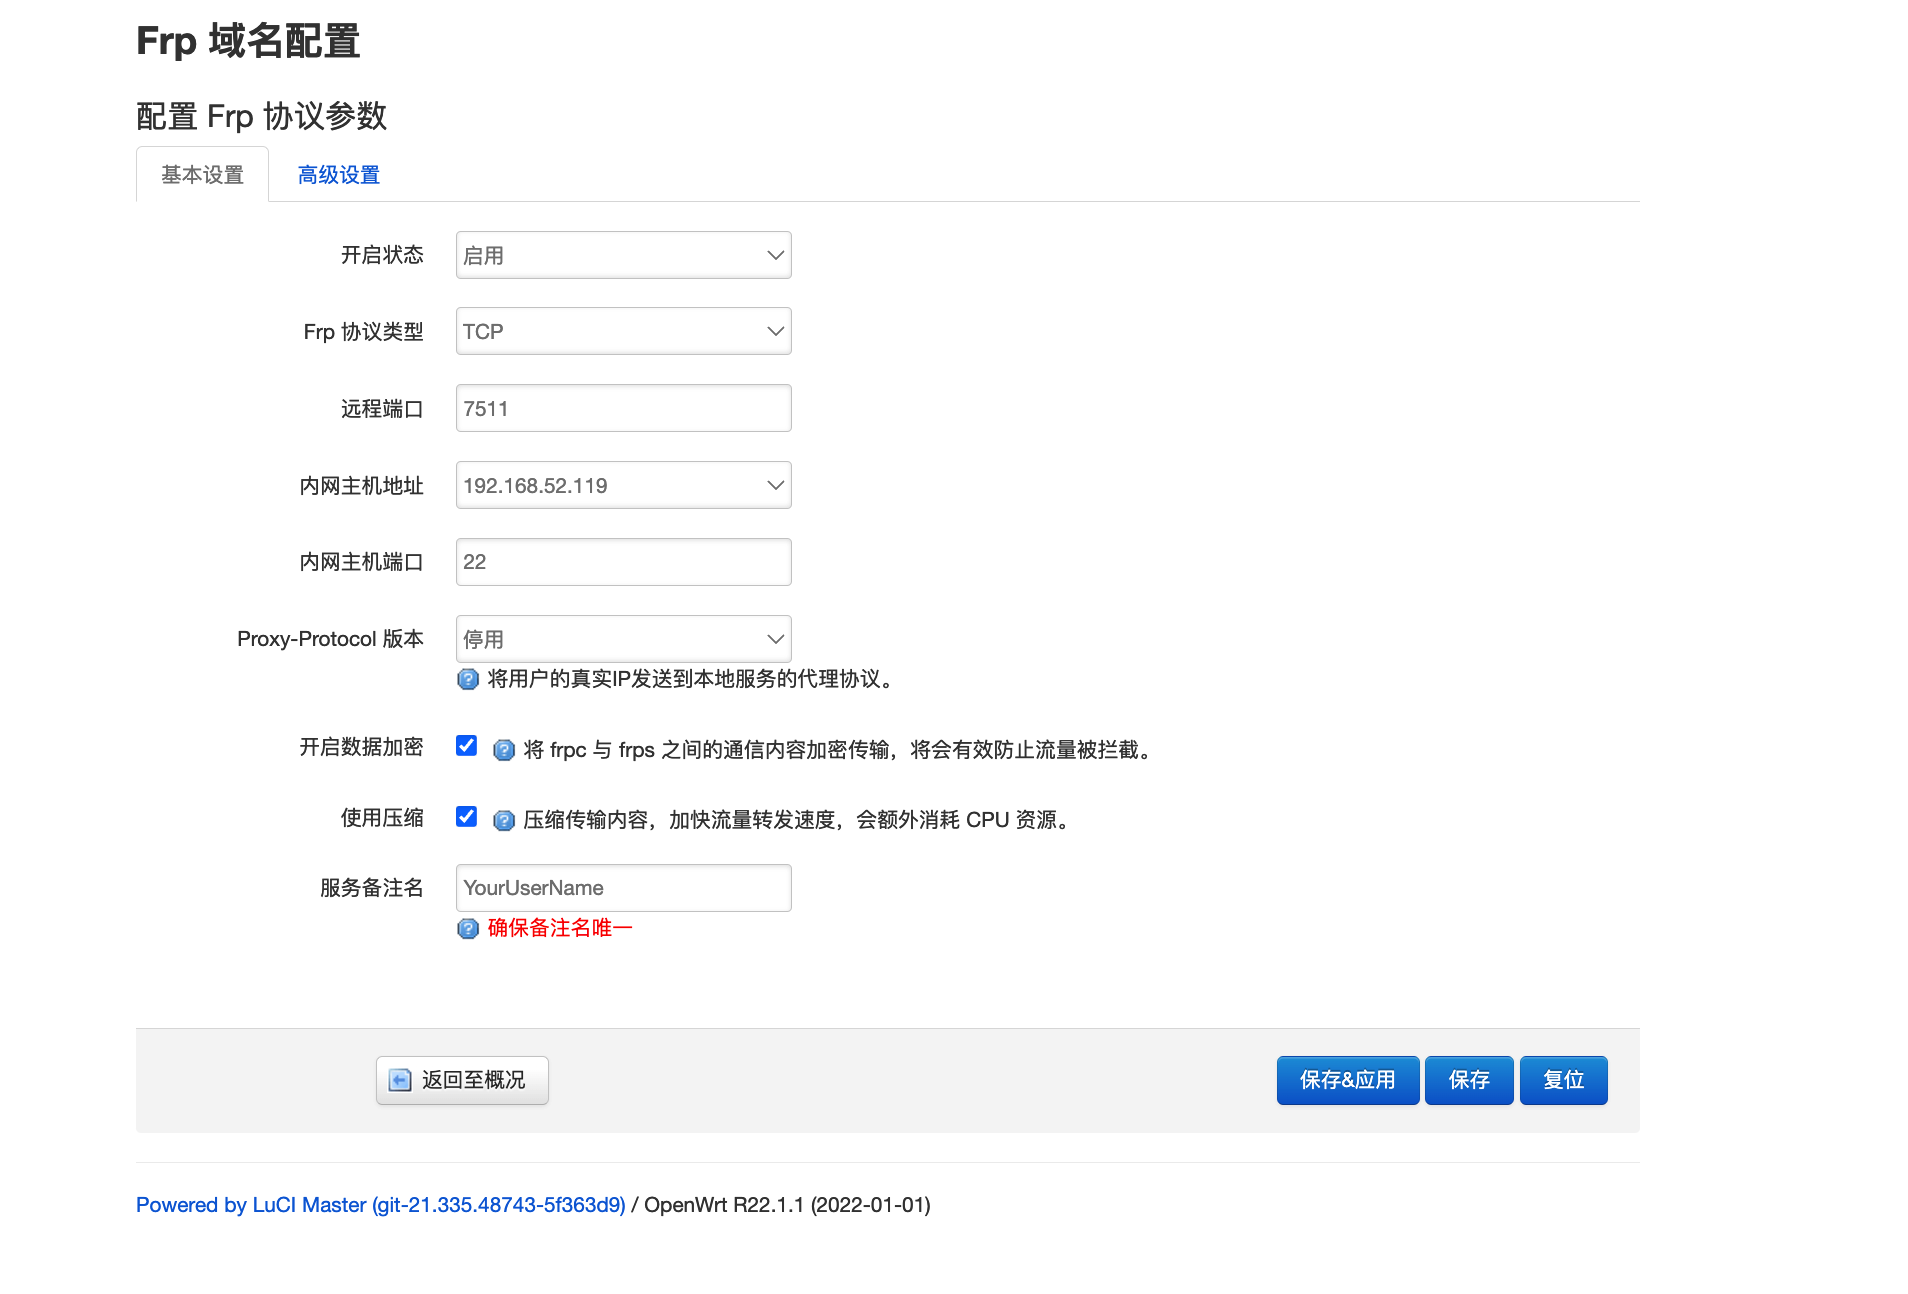
上圖中的配置意思是,通過服務器VPS的7511端口訪問Openwrt 內網的【192.168.52.119】的22端口(ssh協議),注意該端口在服務器的防火牆上放行。
保存與應用配置以後,服務器端的日誌會有提示信息,在frps的後台面板看到該用戶上線。
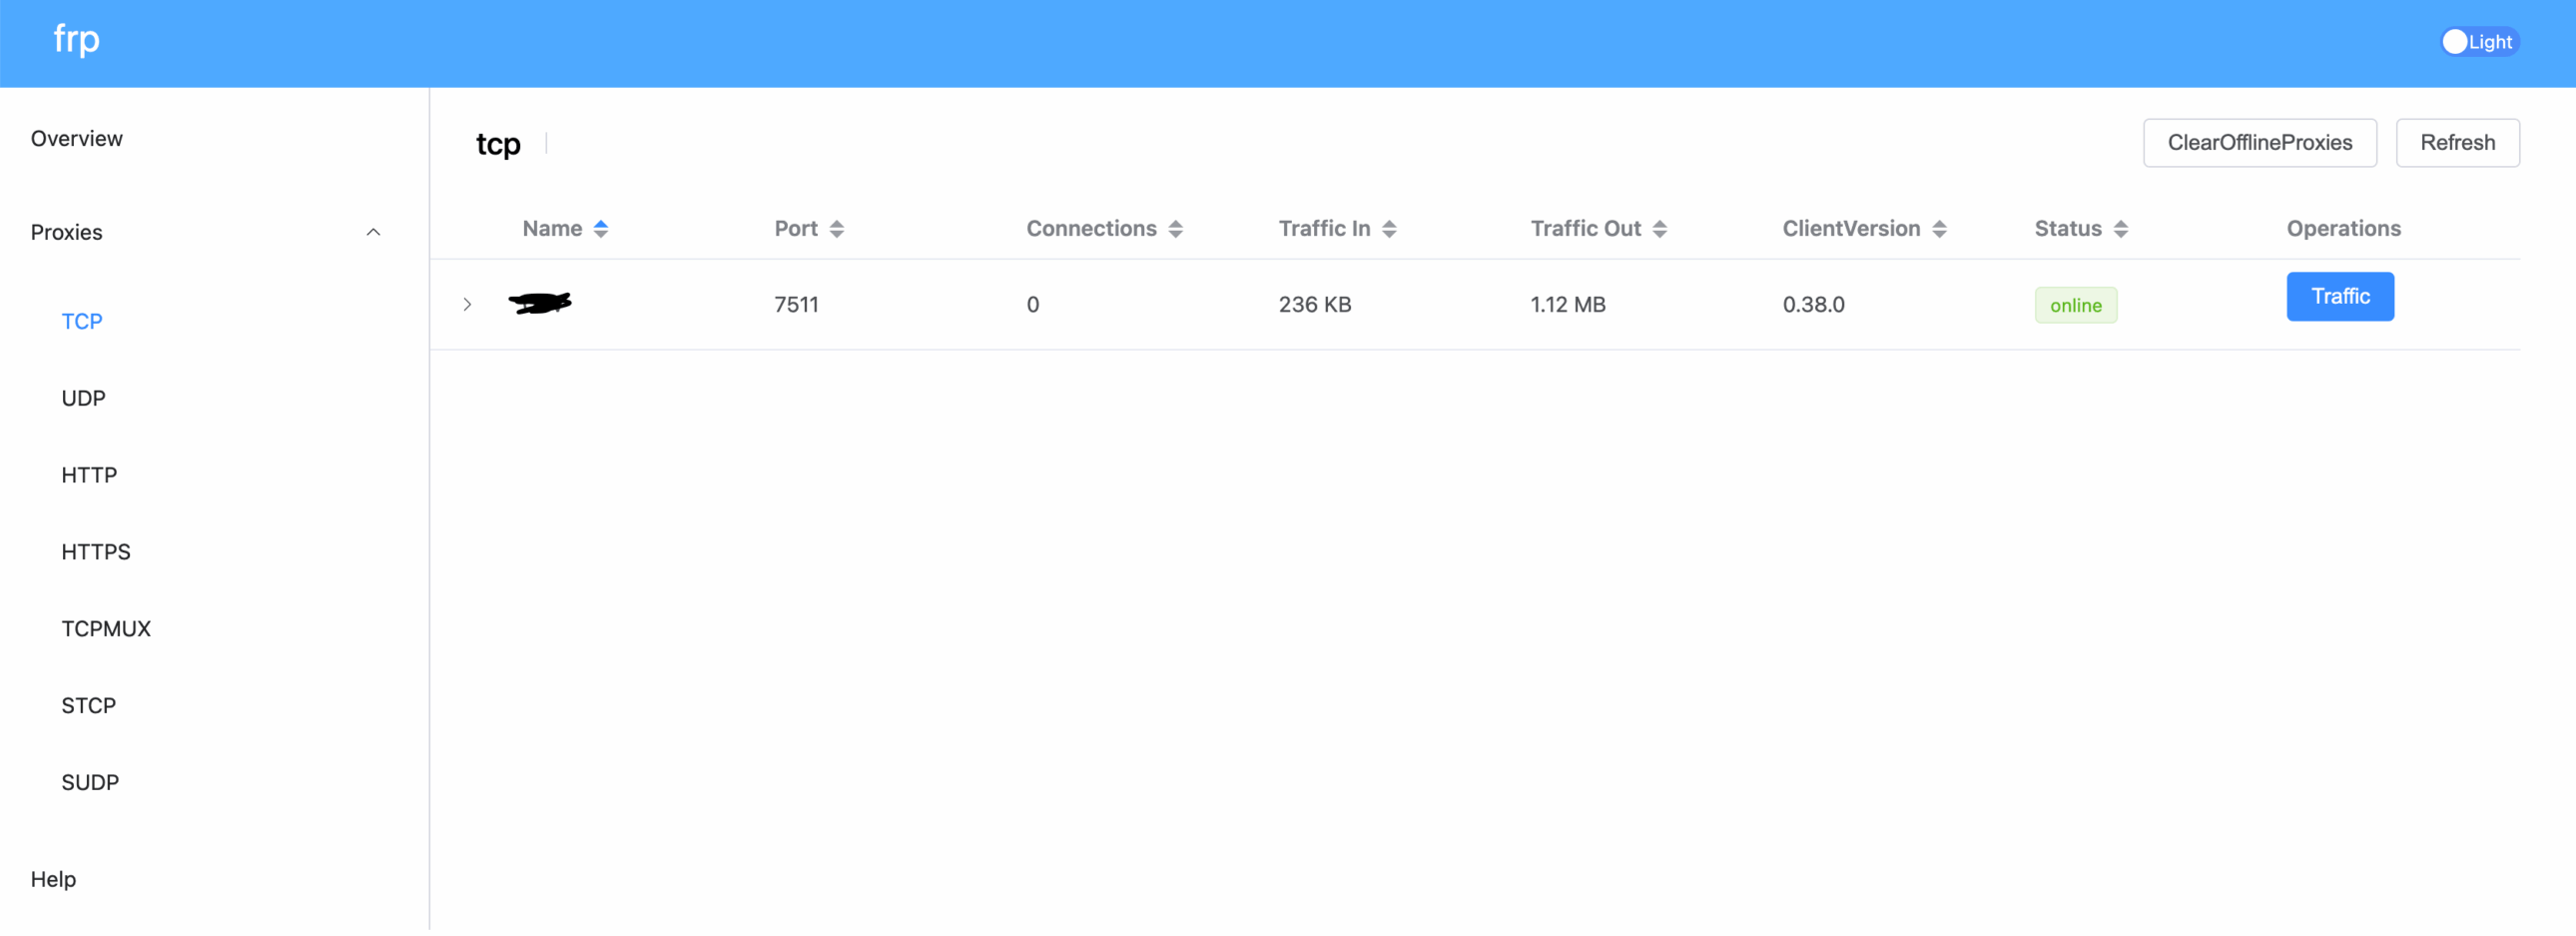
測試連結:
ssh -o Port=7511 username@your_server_domain_or_ip
至此,frp內網穿透完成,如果想要搭建更多的內網穿透服務,可以看官網配置。
希望这一篇文章之后,不要再问这么白痴的问题啦。
MB 和 Mbit/s 是计算机和网络领域中常用的两个单位,但它们代表的含义和衡量的对象完全不同。理解它们的区别非常重要。
| 特征 | MB (兆字节) | Mbit/s (兆比特每秒) |
| 单位 | Megabyte (兆字节) | Megabit per second (兆比特每秒) |
| 衡量 | 数据量、存储容量、文件大小 | 数据传输速度、网络带宽 |
| 大小关系 | 1 Byte = 8 bits | 1 Mbit/s = 1,000,000 bits/s |
| 缩写 | 大写 ‘B’ 表示 Byte (字节) | 小写 ‘b’ 表示 bit (位) |
| 换算 | 无直接换算,是不同维度的单位 | 1 MB/s = 8 Mbit/s (或 1 Mbit/s = 0.125 MB/s) |
| 常见场景 | 文件下载进度(例如,下载速度 10MB/s) | 网络速度测试结果(例如,网速 100Mbps) |
由于 1 Byte = 8 bits,所以在进行数据传输速度的估算时,有一个非常重要的换算关系:
1 MB/s (兆字节每秒) = 8 Mbit/s (兆比特每秒)
这意味着,如果你有一个 100 Mbit/s 的网络连接,你的理论最大下载速度是:
100 Mbit/s÷8=12.5 MB/s
所以,当你看到网络服务提供商宣传 100Mbps 的网速时,实际上的下载速度理论上最高只能达到 12.5MB/s 左右(实际速度还会受到网络损耗、服务器性能等因素影响)。
简而言之,MB 是衡量“量”的单位,而 Mbit/s 是衡量“速度”的单位。
文件/etc/resolv.conf 中更改dns會被覆蓋,想要更改這一部分的dns,需要處理systemd-resolve處理,因為Linux的dns服務會自動更新覆蓋。
總結:
检查状态: resolvectl status

编辑配置: sudo nano /etc/systemd/resolved.conf

设置DNS: 在 [Resolve] 下添加或修改 DNS= 和 FallbackDNS=。

重启服务: sudo systemctl restart systemd-resolved

验证生效: 再次使用 resolvectl status 确认。vim /etc/sysctl.confappend
net.ipv6.conf.all.disable_ipv6 = 1
net.ipv6.conf.default.disable_ipv6 = 1
net.ipv6.conf.lo.disable_ipv6 = 1
then .
sysctl -p.It’s OK , Thanks.
在linux系統中,查看實時流量的命令行工具有nethogs、iftop、vstat、nload等工具。
但是在openwrt下,好像可用的並不是特別的多。
iftop官方有提對openwrt平台的支持。
opkg update
opkg install iftop
在root命令下執行:
iftop就可以看到實時流量。
在 Linux 系统中,同步时间是一个非常重要的任务,它确保了日志记录的准确性、程序的正常运行(尤其是分布式系统和依赖时间戳的服务),以及文件系统的一致性。Linux 同步时间通常通过 NTP (Network Time Protocol) 来实现,这是用于在网络上同步计算机时钟的协议。
根据你的 Linux 发行版和具体需求,有几种常用的方法来同步时间:
systemd-timesyncd (现代 Linux 发行版默认推荐)檢查狀態:
timedatectl輸出結果:
              Local time: Wed 2025-06-18 06:10:31 UTC
           Universal time: Wed 2025-06-18 06:10:31 UTC
                 RTC time: Wed 2025-06-18 06:10:31
                Time zone: Etc/UTC (UTC, +0000)
System clock synchronized: yes
              NTP service: active
RTC in local TZ: noSystem clock synchronized: yes 和 NTP service: active。NTP service 是 inactive,你需要启用它。啟動命令: timedatectl set-ntp true ; 關閉命令: timedatectl set-ntp falsesystemd-timesyncd 默认会使用 pool.ntp.org 或发行版预设的 NTP 服务器。如果你想指定自己的服务器,可以编辑 /etc/systemd/timesyncd.conf 文件: sudo vim /etc/systemd/timesyncd.conf 找到并取消注释或添加 NTP= 行,然后列出你的 NTP 服务器(用空格分隔):[Time] NTP=ntp.aliyun.com ntp.tencent.com [Time] NTP=time.google.com time.android.comsudo systemctl restart systemd-timesyncdchrony (推荐,对于服务器和虚拟机更精确)chrony 是一个更现代、更精确的 NTP 实现,相比传统的 ntpd,它在时钟漂移、间歇性网络连接以及虚拟机环境下的性能更好。许多发行版(如 Red Hat Enterprise Linux / CentOS 8+,以及较新版本的 Ubuntu)已将其作为默认或推荐的 NTP 客户端。
chrony:
sudo apt update sudo apt install chronychrony:sudo vim /etc/chrony.conf 查找 pool 或 server 行,pool 2.pool.ntp.org iburst # 或者指定具体服务器 # server ntp.aliyun.com iburst # server time.nist.gov iburst iburst chrony 服务: sudo systemctl start chronyd sudo systemctl enable chronyd chrony 而不是 chronyd。chrony 状态: chronyc tracking chronyc sources -v tracking 命令显示当前的同步状态,sources -v 显示连接的 NTP 服务器及其同步详情。sudo chronyc makestepntpd (传统 NTP 守护进程)ntpd 是最传统的 NTP 守护进程,功能非常全面,可以作为客户端也可以作为服务器。在一些较旧的系统或需要搭建 NTP 服务器的场景下仍会用到。
ntpd:
sudo apt update sudo apt install ntpsudo vim /etc/ntp.conf 查找 pool 或 server 行,并根据需要添加或修改 NTP 服务器。pool 0.pool.ntp.org iburst pool 1.pool.ntp.org iburst pool 2.pool.ntp.org iburst pool 3.pool.ntp.org iburst # server time.nist.gov iburst# server time.google.com iburst# server time.android.com ibrustntpd 服务: sudo systemctl start ntp sudo systemctl enable ntpntpd 状态: ntpq -p 此命令会显示 NTP 对等体的状态。* 星号表示当前正在同步的服务器。可能需要等待几分钟才能看到星号。ntpdate 命令曾被用于一次性地同步时间,但现在已被弃用,因为它不会考虑时钟漂移,并且可能导致时间跳变过大,对某些应用程序产生负面影响。现代系统建议使用 timedatectl 或 chronyc -q 代替。
最佳实践:
chrony 或 systemd-timesyncd 这类守护进程进行持续同步,它们会平滑地调整时间,避免大的时间跳变。簡介: 在Openwrt的路由器操作系統中,經常會出現需要更改語言的時候,比如:對英文不熟練,在查詢 文檔的時候是英文文檔要對著英文操作,或者想驗證一些配置選項;或者想要去設置成別的語言包:簡體中文,台灣繁體字,香港繁體字等。個人比較喜歡用Terminal ,所以,以下基本都是用命令行的方式。
通過ssh登陸 terminal .
先執行更新:
opkg update列出目标的语言包:(不要搜索opkg list |grep -i luci-i18,会出现很多软件的语言包)
opkg list |grep -i luci-i18n-baseluci-i18n-base-ar - 25.165.68821~fe30872 - Translation for luci-base - العربية (Arabic)
luci-i18n-base-bg - 25.165.68821~fe30872 - Translation for luci-base - български (Bulgarian)
luci-i18n-base-bn - 25.165.68821~fe30872 - Translation for luci-base - বাংলা (Bengali)
luci-i18n-base-ca - 25.165.68821~fe30872 - Translation for luci-base - Català (Catalan)
luci-i18n-base-cs - 25.165.68821~fe30872 - Translation for luci-base - Čeština (Czech)
luci-i18n-base-da - 25.165.68821~fe30872 - Translation for luci-base - Dansk (Danish)
luci-i18n-base-de - 25.165.68821~fe30872 - Translation for luci-base - Deutsch (German)
luci-i18n-base-el - 25.165.68821~fe30872 - Translation for luci-base - Ελληνικά (Greek)
luci-i18n-base-es - 25.165.68821~fe30872 - Translation for luci-base - Español (Spanish)
luci-i18n-base-fa - 25.165.68821~fe30872 - Translation for luci-base - Farsi (Persian)
luci-i18n-base-fi - 25.165.68821~fe30872 - Translation for luci-base - Suomi (Finnish)
luci-i18n-base-fil - 25.165.68821~fe30872 - Translation for luci-base - Filipino (Philippinic)
luci-i18n-base-fr - 25.165.68821~fe30872 - Translation for luci-base - Français (French)
luci-i18n-base-he - 25.165.68821~fe30872 - Translation for luci-base - עִבְרִית (Hebrew)
luci-i18n-base-hi - 25.165.68821~fe30872 - Translation for luci-base - हिंदी (Hindi)
luci-i18n-base-hu - 25.165.68821~fe30872 - Translation for luci-base - Magyar (Hungarian)
luci-i18n-base-it - 25.165.68821~fe30872 - Translation for luci-base - Italiano (Italian)
luci-i18n-base-ja - 25.165.68821~fe30872 - Translation for luci-base - 日本語 (Japanese)
luci-i18n-base-ko - 25.165.68821~fe30872 - Translation for luci-base - 한국어 (Korean)
luci-i18n-base-lt - 25.165.68821~fe30872 - Translation for luci-base - Lietuvių (Lithuanian)
luci-i18n-base-mr - 25.165.68821~fe30872 - Translation for luci-base - Marāṭhī (Marathi)
luci-i18n-base-ms - 25.165.68821~fe30872 - Translation for luci-base - Bahasa Melayu (Malay)
luci-i18n-base-nl - 25.165.68821~fe30872 - Translation for luci-base - Nederlands (Dutch)
luci-i18n-base-no - 25.165.68821~fe30872 - Translation for luci-base - Norsk (Norwegian)
luci-i18n-base-pl - 25.165.68821~fe30872 - Translation for luci-base - Polski (Polish)
luci-i18n-base-pt - 25.165.68821~fe30872 - Translation for luci-base - Português (Portuguese)
luci-i18n-base-pt-br - 25.165.68821~fe30872 - Translation for luci-base - Português do Brasil (Brazilian Portuguese)
luci-i18n-base-ro - 25.165.68821~fe30872 - Translation for luci-base - Română (Romanian)
luci-i18n-base-ru - 25.165.68821~fe30872 - Translation for luci-base - Русский (Russian)
luci-i18n-base-sk - 25.165.68821~fe30872 - Translation for luci-base - Slovenčina (Slovak)
luci-i18n-base-sv - 25.165.68821~fe30872 - Translation for luci-base - Svenska (Swedish)
luci-i18n-base-tr - 25.165.68821~fe30872 - Translation for luci-base - Türkçe (Turkish)
luci-i18n-base-uk - 25.165.68821~fe30872 - Translation for luci-base - Українська (Ukrainian)
luci-i18n-base-vi - 25.165.68821~fe30872 - Translation for luci-base - Tiếng Việt (Vietnamese)
luci-i18n-base-yua - 25.165.68821~fe30872 - Translation for luci-base - Yucateco (Yucatec Maya)
luci-i18n-base-zh-cn - 25.165.68821~fe30872 - Translation for luci-base - 简体中文 (Chinese Simplified)
luci-i18n-base-zh-tw - 25.165.68821~fe30872 - Translation for luci-base - 繁體中文 (Chinese Traditional)安装需要的安装包,以日本语為例。
opkg install luci-i18n-base-jaMultiple packages (libgcc1 and libgcc1) providing same name marked HOLD or PREFER. Using latest.
Installing luci-i18n-base-ja (25.165.68821~fe30872) to root...
Downloading https://mirrors.tencent.com/lede/releases/24.10.0/packages/x86_64/luci/luci-i18n-base-ja_25.165.68821~fe30872_all.ipk
Configuring luci-i18n-base-ja.系統【system】-> 語言與樣式【language and styles】
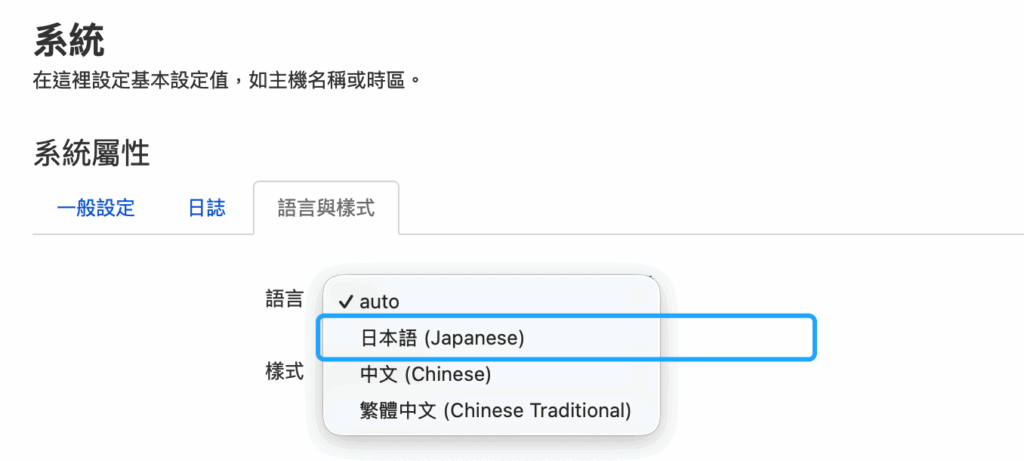
選中【日本語】後【保存】,然後刷新,就看到語言更改。
英語是openwrt默認的語言,所以你無法安裝英語的語言包,但是你在語言列表中看不到,如何解決?
通過openwrt uci 命令:
uci set luci.main.lang='en'
uci commit luci
/etc/init.d/uhttpd restart
刷新後解決該問題。
entire error message :
no required module provides package github.com/go-martini/martini: go.mod file not found in current directory or any parent directory; see 'go help modules'The error message “no required module provides package github.com/go-martini/martini: go.mod file not found in current directory or any parent directory; see ‘go help modules'” indicates that your Go project is not properly set up as a Go module, or that the go.mod file is missing or in the wrong place.
Here’s a breakdown of the problem and how to solve it, especially in the context of using a package like github.com/go-martini/martini:
Understanding Go Modules
Go Modules are the official dependency management system in Go, introduced in Go 1.11 and becoming the default in Go 1.16. They manage the exact versions of all dependencies (packages) your project needs.
A Go module is defined by a go.mod file, which lives at the root of your project’s directory. This file declares the module’s path and lists its dependencies.
Why You’re Seeing This Error
go.mod: Your project directory (or any parent directory) doesn’t contain a go.mod file. Without it, Go doesn’t know it’s a module and where to find its dependencies.go run or go build from a subdirectory within your module, but the go.mod file is in a parent directory. While Go should typically find it, sometimes specific commands or environments might miss it.$GOPATH/src. With modules, your code can live anywhere, but if you’re trying to mix old and new practices, it can cause confusion.How to Solve It ?
Follow these steps to correctly set up your Go module and resolve the error:
Step 1: Navigate to Your Project Root
Make sure you are in the directory where your Go project’s main code (.go files) resides, or where you intend for the go.mod file to live. This is usually the top-level directory of your application.
For example, if your project structure looks like this:
my-martini-app/
├── main.go
└── (other files)
You should be in the my-martini-app/ directory.
Step 2: Initialize Your Go Module
If you don’t have a go.mod file, you need to initialize your module. In your project root, run:
go mod init your_module_nameReplace your_module_name with the desired import path for your module. This usually follows a pattern like github.com/your_username/your_project_name or example.com/your_project.
Example:
If your project is my-martini-app and you plan to host it on GitHub:
go mod init github.com/your_username/my-martini-appThis command will create a go.mod file in your current directory.
Step 3: Add the Martini Dependency
Now that you have a go.mod file, you can tell Go to add go-martini/martini as a dependency.
Bash
go get github.com/go-martini/martiniThis command will:
martini package and its dependencies.github.com/go-martini/martini to your go.mod file.go.sum file, which stores cryptographic checksums of your module’s dependencies to ensure integrity.Step 4: Run Your Application
After completing the above steps, you should be able to run your application:
go run main.go(Or go build followed by running the executable).
Example Walkthrough:
Let’s say you have a simple main.go file:
// main.go
package main

import (
	"github.com/go-martini/martini"
)

func main() {
	m := martini.Classic()
	m.Get("/", func() string {
		return "Hello world!"
	})
	m.Run()
}
mkdir my-martini-app cd my-martini-appmain.go inside my-martini-app/ and paste the code above.go mod init github.com/your_username/my-martini-app You’ll see: go: creating new go.mod: module github.com/your_username/my-martini-appgo get github.com/go-martini/martini You’ll see output like: go: downloading github.com/go-martini/martini v1.0.0 go: added github.com/go-martini/martini v1.0.0 (The version might differ). Now, if you ls, you’ll see go.mod and go.sum files. cat go.mod will show something like: module github.com/your_username/my-martini-app go 1.22 require github.com/go-martini/martini v1.0.0 // indirect (The go 1.22 indicates your Go version. indirect means it’s a transitive dependency, or a direct dependency that doesn’t have a direct import in a file yet, but will be resolved).go run main.go You should see output indicating Martini is running (e.g., [martini] listening on :3000).This process ensures your Go project correctly uses Go Modules to manage its dependencies.
wp-cli 是wordpress的命令行接口,你可以通过该命令实现更新组件、配置多网站安装和更多功能,而不需要一个web浏览器,比较适合开发者或者喜欢命令行的用户使用。
brew install wp-cli通過下載phar 文件是官方比較推薦的安裝方式。在安裝wp-cli之前,請確認一下本地的安裝環境:
滿足了以上的安裝環境,下載phar文檔:
curl -O https://raw.githubusercontent.com/wp-cli/builds/gh-pages/phar/wp-cli.phar本地會有一個wp-cli.phar文檔,檢查文檔信息:
php wp-cli.phar --info輸出結果:
为了保证整个wp-cli在全局中使用或者别名为wp命令,先要赋予wp-cli.phar有x的权限:
chmod +x wp-cli.phar通过mv命令执行重命名:
sudo mv wp-cli.phar /usr/local/bin/wp執行wp --info命令,會得到當前wp安裝環境的更詳細的信息:
OS:	Linux 4.18.0-25-generic #26-Ubuntu SMP Mon Jun 24 09:32:08 UTC 2019 x86_64
Shell:	/bin/bash
PHP binary:	/usr/bin/php7.2
PHP version:	7.2.24-0ubuntu0.18.04.17
php.ini used:	/etc/php/7.2/cli/php.ini
MySQL binary:	/usr/bin/mysql
MySQL version:	mysql  Ver 14.14 Distrib 5.7.37, for Linux (x86_64) using  EditLine wrapper
SQL modes:
WP-CLI root dir:	phar://wp-cli.phar/vendor/wp-cli/wp-cli
WP-CLI vendor dir:	phar://wp-cli.phar/vendor
WP_CLI phar path:	/home/chengyue.wang
WP-CLI packages dir:
WP-CLI cache dir:	/home/wong/.wp-cli/cache
WP-CLI global config:
WP-CLI project config:
WP-CLI version:	2.11.0
OK,wp的安装就完成了。
如果你需要wordpress的主题或者插件开发,请联系我。