手动升级 OpenWrt 的PassWall軟件

背景

最近使用的舊版軟件PassWall(以下簡稱:PW)一直在出現自動關掉的問題,看軟件版本有點太低了,於是就考慮嘗試升級相關的軟件,使用Openwrt的內部升級系統,發現提示升級不了,只能手動更新,為了方便使用開發環境需要的美國網絡,在不更換Openwrt系統的情況下,升級該軟件。

介紹

PW的軟件在github上有專門的倉庫進行維護,所以只需要自己的Openwrt版本下載響應的軟件版本即可。

PW 最新版本的支持的內容比較豐富,如果不是PW軟件出現異常,最好不要動,只需要更新部分組件即可。

操作步驟:

注意⚠️:在進行升級的時候,做好配置的備份或者快照備份,防止出現異常導致無法回滾正常狀態。


  1. 登陸Openwrt查看軟路由的CPU架構,在OpenWrt的TTYD終端或者電腦客戶端SSH登陸到路由器通過執行:
uname -m

返回的結果如下:

x86_64

其中關鍵字x86_64 就是該軟路由的CPU架構。

2. 在Github的PW倉庫中的releases界面查找符合CPU架構的軟件版本:

PW的軟件發佈頁面: https://github.com/xiaorouji/openwrt-passwall/releases

找到x86_64的關鍵字的軟件包,如下圖:

使用wget或者直接瀏覽器中下載zip壓縮包。

wget https://github.com/xiaorouji/openwrt-passwall/releases/download/25.4.20-1/passwall_packages_ipk_x86_64.zip

解壓該安裝包:

 unzip passwall_packages_ipk_x86_64.zip

輸出結果:

Archive:  passwall_packages_ipk_x86_64.zip
  inflating: chinadns-ng_2025.03.27-r1_x86_64.ipk
 extracting: dns2socks_2.1-r2_x86_64.ipk
  inflating: geoview_0.1.6-r1_x86_64.ipk
  inflating: hysteria_2.6.1-r1_x86_64.ipk
 extracting: ipt2socks_1.1.4-r3_x86_64.ipk
 extracting: microsocks_1.0.5-r1_x86_64.ipk
  inflating: naiveproxy_135.0.7049.38-r1_x86_64.ipk
  inflating: shadowsocks-rust-sslocal_1.23.0-r1_x86_64.ipk
  inflating: shadowsocks-rust-ssserver_1.23.0-r1_x86_64.ipk
  inflating: shadowsocksr-libev-ssr-local_2.5.6-r11_x86_64.ipk
  inflating: shadowsocksr-libev-ssr-redir_2.5.6-r11_x86_64.ipk
  inflating: shadowsocksr-libev-ssr-server_2.5.6-r11_x86_64.ipk
 extracting: simple-obfs_0.0.5-r1_x86_64.ipk
  inflating: sing-box_1.11.8-r1_x86_64.ipk
 extracting: tcping_0.3-r1_x86_64.ipk
  inflating: trojan-plus_10.0.3-r2_x86_64.ipk
  inflating: tuic-client_1.0.0-r1_x86_64.ipk
  inflating: v2ray-geoip_202504050136.1_all.ipk
  inflating: v2ray-geosite_20250407044718.1_all.ipk
  inflating: v2ray-plugin_5.25.0-r1_x86_64.ipk
  inflating: xray-core_25.3.31-r1_x86_64.ipk
  inflating: xray-plugin_1.8.24-r1_x86_64.ipk

會出現很多的*.ipk文件,安裝這些文件,執行:

opkg install *.ipk

PW的组件升級就完成了。如果其中遇到什麼問題,可以在評論區留言的喔。

如果想要升级PW的本身軟件而非組件,則下載PW的的ipk.

在上圖的releases界面中,選擇PW的ipk下載,(選擇適合你的Openwrt版本),我的OpenWrt版本是24.10,通過 cat /etc/openwrt_release 命令查看Openwrt的版本:

cat /etc/openwrt_release

輸出的結果:

DISTRIB_ID='OpenWrt'
DISTRIB_RELEASE='24.10.0'
DISTRIB_TARGET='x86/64'
DISTRIB_ARCH='x86_64'
DISTRIB_TAINTS='no-all'
DISTRIB_REVISION='R25.2.5'
DISTRIB_DESCRIPTION='bleachwrt plus 20250213 @ '

其中,DISTRIB_RELEASE 常量就是當前Openwrt的版本。

所以我選擇了帶有“luci-24.10“關鍵字的進行下載:

wget https://github.com/xiaorouji/openwrt-passwall/releases/download/25.4.20-1/luci-24.10_luci-app-passwall_25.4.20-r1_all.ipk

然後執行:

opkg install luci-24.10_luci-app-passwall_25.4.20-r1_all.ipk

PW的主程序就更新完成啦。

总结:

本文通过手动下载 PW 相关组件包,通过命令的方式升级,实现无需重装 OpenWrt 升级插件版本,举一反三,如果要升级其他组件,只要知道相关依赖的组件包也同样可以使用手动下载安装上传达到升级的目的。

推荐系统二三事

推荐系统, 在目前信息大爆炸的年代,早就成了一个耳熟能详的词语,对于目前用短视频APP的用户,应该不会感到陌生,在抖音,快手,YouTube,FaceBook,Amazon ,Tmall 等等各种社交或者购物网站,都已经看到这样的现象:用户浏览了几个视频或者商品,系统会自动推荐很多相关或者类似的视频或者商品。 本文皆在概述当前主流的推荐系统算法,帮助数据科学家根据企业的限制条件和需求,选择最合适的算法。

下面就總結一下目前市面存在的推薦算法

Collaborative filtering(協同過濾)-CF

協同過濾是推薦系統中比較常見(most commonly) 的推薦系統算法之一。 即使是初學的數據專家也可以利用它構建一個個性化的電影推薦系統,最常見的比如:一個簡歷項目。

當我們想要給一個用戶推薦某些內容的時候,最常見的做法是:找用戶的興趣相似的用戶,分析他們的行為,然後推薦給用戶類似的內容。 或者我們也可以查看與該用戶購買過的商品,然後推薦類似的商品。

基本邏輯就是:

  1. 你喜歡的,也許和你相似的人也喜歡
  2. 如果你喜歡電影A,你也可能喜歡電影B,因為很多人喜歡電影A的時候,也喜歡電影B

These are two basic approaches in Collaborative Filtering :user-based collaborative filtering and item-based collaborative filtering ,respectively.

在这两种情况下,推荐引擎的工作过程通常包括两个步骤:

  1. 找出数据库中与目标用户或物品相似的其他用户或物品;
  2. 根据这些更相似(most similar)的用户或物品的“总权重”,评估其对某个产品的评分,并据此预测目标用户可能会给出的评分。

那麼在算法中,我們如何理解“更相似(Most similar)”這個意思?

我们拥有每个用户的一个偏好向量,矩阵R中的一行,用户的对某个产品的评分向量,矩阵R中的列。

如下表格:

Matrix ‘s user and Product or item.

首先,我们只保留在两个向量中都已知评分的元素。

例如,如果我们想比较 BillJane 的相似度,我们可以指出:Bill 还没有看过《泰坦尼克号》,而 Jane 目前还没看过《蝙蝠侠》,所以我们只能通过他们**共同看过的《星球大战》**来衡量相似度。

话说回来,谁居然没看过《星球大战》呢,对吧?🙂

市面上用来评估相似度的技术-Cosine.


我们通过计算用户或物品向量之间的相似度或相关性,并在最后一步根据相似度的权重,采用加权算术平均值来填补评分矩阵中缺失的单元格(空值)。

推荐系统中的矩阵分解(The Matrix decomposition of recommendation)

接下来的一个有趣方法是基于矩阵分解的推荐算法。这是一种非常优雅的推荐方法,因为通常在处理矩阵分解时,我们并不会特别关注结果矩阵中的列和行到底代表什么

但在这个推荐引擎中,我们可以清楚地看到:

  • u:表示第 i 个用户的兴趣向量
  • v:表示第 j 部电影的属性(参数)向量

因此,我们可以用向量内积(点积)来近似表示用户 i 对电影 j 的评分 x

我们通过已知的评分数据来构建这些用户向量 u和电影向量v,并使用它们来预测未知评分

例如,经过矩阵分解后,我们得到了 Ted 的向量为 (1.4, 0.9),电影 A 的向量为 (1.4, 0.8)。

那么我们就可以通过计算这两个向量的点积(dot product),来还原出 Ted 对电影 A 的预测评分。

User’s u and item’s v

Clustering-聚类

Clustering 聚类,是一种无监督学习技术,是内容推荐的算法之一,用于将用户和物品分组,从而提高推荐的准确性和效率。

前面介绍的推荐算法相对较为简单,更适合用于小型系统。到目前为止,我们一直将推荐问题视为监督式机器学习任务来处理。现在,是时候引入无监督学习方法来解决这个问题了。

设想我们正在构建一个大型推荐系统,这时候仅靠协同过滤(Collaborative Filtering)或矩阵分解(Matrix Decomposition)已经无法高效处理全部数据。

此时,最自然的想法就是引入 聚类(Clustering)方法。

At the start of a business,there is a lack of previous user’s grades,and clustering would be the best approach.

单独使用聚类算法其实效果是有限的。

因为实际上,它所做的只是:识别用户群体,然后对同一群体中的所有用户推荐相同的商品或内容。

换句话说,每个群体内的用户得到的是一套“统一”的推荐,个性化程度较低。

当我们拥有足够多的数据时,更好的做法是将聚类作为协同过滤算法的预处理步骤

用于缩小潜在邻居的搜索空间,从而提高协同过滤的效率和精度。

此外,聚类的引入还可以在更复杂的推荐系统中提升整体性能

在这种方法中,每个聚类(用户群)都会被分配一组“典型偏好”

这些偏好是基于该群体内用户的整体行为提炼而来的。

之后,该群体中的所有用户都会收到基于该群体偏好生成的推荐内容

深度学习推荐系统-Deep learning approach for recommendations

在过去的十年里,神经网络取得了巨大的发展飞跃。如今,它被广泛应用到各类场景中,并逐步取代传统的机器学习方法。接下来,我会为你讲解YouTube 如何运用深度学习方法来实现推荐系统的。

毫无疑问,为这样的平台设计推荐机制是一项极具有挑战性的任务。因为这个推荐系统挑战在于:

  1. 平台规模大(Big Scale)
  2. 内容库频繁的更新(Dynamic Corpus)
  3. 存在许多不可观测的外部因素(Unobservable external factors)

The YouTube Recommendation system algorithms consists of two neural networks .

  1. candidate generation
  2. for Ranking .
YouTube ‘s Deep Learning System Recommendations

用户的历史行为:点击、观看、搜索、点赞

以用户历史行为作为输入,候选词生成网络会显著缩小候选词视频的数量,以庞大的内容库中筛选出一组与用户相关的视频内容高。所生成的候选项是对该用户最相关的内容,而我们正在预测该用户对这些内容的评分或偏好。该网络的目标,通过协同过滤的方式实现初步的个性化推荐。


在此阶段,我们已经筛选出一小部分与用户相似的候选视频。接下来的目标是更细致地分析这些候选项,以便做出最优决策。这个任务由排序网络(ranking network)完成,它会根据一个目标函数为每个视频打分。该函数结合了描述视频的数据和用户行为信息。得分最高的视频将按照分数排序,呈现给用户。

Ranking network.

From Youtube Recommendation-deep Neural networks.


通过采用两阶段的方法,我们可以在极为庞大的视频库中进行推荐,同时确保最终选出的少量视频对用户而言是高度个性化且具有吸引力的。该设计还使我们能够将来自其他来源生成的候选视频融合在一起。


推荐任务被建模为一个极端多分类(extreme multiclass classification)问题,即在给定用户(U)和上下文(C)的条件下,从视频库(V)中数百万个视频类别(i)中准确预测用户在某一时刻 t 所观看的特定视频 w_t。


在构建个性化推荐系统之前需要注意的重要事项:

  1. 如果你拥有一个大型数据库,并希望从中进行在线推荐,最有效的方式是将该问题划分为两个子问题:a.选择Top-N候选;b.排名评分。
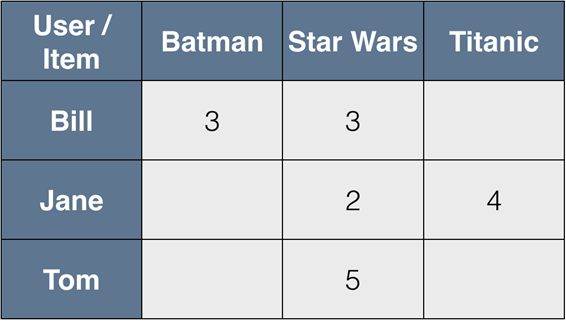
  2. 那么,如何评估模型的推荐质量呢?除了使用标准的质量评估指标外,推荐系统还常用一些特定的评估指标,如:Recall@k(召回率)Precision@k(准确率)Average Recall@k(平均召回率)Average Precision@k(平均准确率)。强烈建议查阅推荐系统中关于这些评估指标的详细说明。
  3. 如果你采用分类算法来解决推荐问题,需要考虑负样本的生成问题。例如,如果用户购买了某个被推荐的商品,这可以作为一个正样本,但不应简单地将其未购买的其他推荐项视为负样本。
  4. 关注算法的线上评分(online-score)与线下评分(offline-score)。仅依赖历史数据训练模型,可能会导致“原始”或过时的推荐结果,因为此类算法无法捕捉到用户的新趋势与偏好。

Related Link

  1. Deep Neural Networks for YouTube Recommendations.
  2. 9 Must-Have Datasets for Investigating Recommender Systems
  3. Recommender Systems: New Comprehensive Textbook by Charu Aggarwal
  4. Netflix Prize Analyzed: Movie Ratings and Recommender Systems

More On This Mac

How To Install PHP 7.4 and Set Up on Ubuntu 20.04

Introduction

PHP is a popular server scripting language known for creating dynamic and interactive web pages. Getting up and running with your language of choice is the first step in learning to program.

This tutorial will guide you through installing PHP 7.4 on Ubuntu and setting up a local programming environment via the command line. You will also install a dependency manager, Composer, and test your installation by running a script.

You will want to avoid relying on the default version of PHP because that default version could change depending on where you are running your code. You may also wish to install a different version to match an application you are using or to upgrade to a newer version, such as PHP 8.


Setting up PHP7.4

Run the following command to update apt-get itself, which ensures that you have access to the latest versions of anything you want to install:

sudo apt update 

Next , install the software-properties-common ,which adds management for additional software sources:

sudo apt -y install software-properties-common

Next, install the repository ppa:ondrej/php, which will give you all your versions of PHP:
about the ppa:ondrej/php , you can visit the link https://launchpad.net/~ondrej/+archive/ubuntu/php/

sudo add-apt-repository ppa:ondrej/php

Finally, you update apt-get again so your package manager can see the newly listed packages:

sudo apt update 

Then ,You can install the php7.4 and its extensions.

sudo apt install php7.4-cli
sudo apt install php7.4-fpm

extensions:

php7.4 extensions.
php7.4 ‘s extensions

Then ,check the php’s version.

php7.4  -v

output :

ubuntu@channel:~$ php -v
PHP 7.4.3-4ubuntu2.29 (cli) (built: Mar 25 2025 18:57:03) ( NTS )
Copyright (c) The PHP Group
Zend Engine v3.4.0, Copyright (c) Zend Technologies
    with Zend OPcache v7.4.3-4ubuntu2.29, Copyright (c), by Zend Technologies

You can also install more than one package at one time.Here are a few suggestions of the most common modules you will most likely want to install .example :

sudo apt install php7.4-zip

or

sudo apt install php7.4-mbstring

if you want to install swoole ,try to install php7.4-dev ,get the pecl tool:

sudo pecl install swoole 

or describe a swoole version .

sudo pecl install https://pecl.php.net/get/swoole-4.8.12.tgz

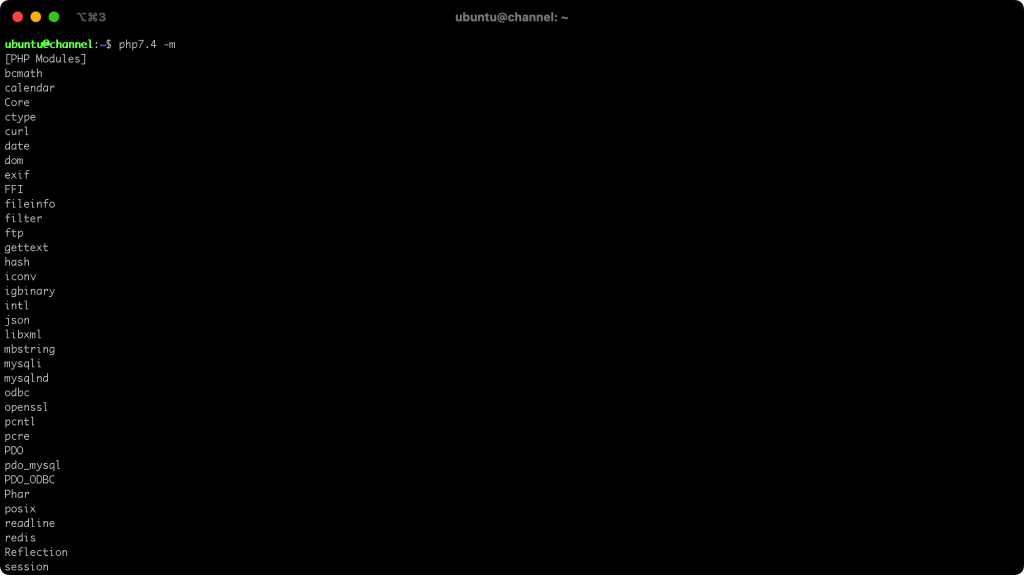
Then you can list all php modules you have installed with command line :

sudo php7.4 -m 

You will receive something similar to following:

php7.4 -m ‘s output

Manage package using composer.

Composer is a tool for dependency management in PHP. It allows you to declare the libraries your project depends on and will manage installing and updating these packages.

Although similar, Composer is not a package manager in the same sense as yum or apt. It deals with “packages” or libraries, but it manages them on a per-project basis, installing them in a directory (e.g. vendor) inside your project. By default, it does not install anything globally. Thus, it is a dependency manager. It does, however, support a global project for convenience via the global command.

This idea is not new, and Composer is strongly inspired by Node’s npm and Ruby’s bundler.

Suppose:

  • You have a project that depends on several libraries.
  • Some of those libraries depend on other libraries.

Composer:

  • Enables you to declare the libraries you depend on.
  • Finds out which versions of which packages can and need to be installed and installs them by downloading them into your project.
  • Enables you to update all your dependencies in one command.
  • Enables you to see the Basic Usage chapter for more details on declaring dependencies.

There are, in short, two ways to install Composer: locally as part of your project or globally as a system-wide executable. Either way, you will start with the local install.

To quickly install Composer in the current directory, run this script in your terminal:

php7.4 -r "copy('https://getcomposer.org/installer', 'composer-setup.php');"
php7.4 -r "if (hash_file('sha384', 'composer-setup.php') === 'dac665fdc30fdd8ec78b38b9800061b4150413ff2e3b6f88543c636f7cd84f6db9189d43a81e5503cda447da73c7e5b6') { echo 'Installer verified'.PHP_EOL; } else { echo 'Installer corrupt'.PHP_EOL; unlink('composer-setup.php'); exit(1); }"
php7.4 composer-setup.php
php7.4 -r "unlink('composer-setup.php');"

Most likely, you want to put the composer.phar into a directory on your PATH, so you can simply call composer from any directory (Global install), using for example:

sudo mv composer.phar /usr/local/bin/composer

Now to run Composer , use composer instead of php composer.phar . To check for your Composer Version :

 composer -V

or

composer --version

Test PHP7.4 environment.

To test that your system is configured correctly for PHP, you can create and run a basic PHP script. Call this script p.php:

This will open a new blank file.

Press the i key , then put the following text , which is valid PHP code,inside the file :

Once you’ve added the text, save and close the file. You can do this by pressing the ESC key and pressing the : key. Then input the wq .

Now you can test to make sure that PHP processes your script correctly. Type php to tell PHP to process the file, followed by the name of the file:

If the PHP is processed properly , you will see only the characters with the quotes:

PHP has successfully processed the script, meaning that your PHP environment is successfully installed and you’re ready to continue your programming journey.

Python error:

Graphic showing the text 'SyntaxError in Python' with a Python logo on a gradient blue and orange background.

Illustration of a SyntaxError in Python programming.

ImportError: No module named setuptools

This error occurs when Python can’t find the setuptools module, which is a package commonly used for installing and managing Python packages. Here’s how you can fix it:

  1. Install setuptools using pip: Run this command in your terminal or command prompt:pip install setuptools
  2. If pip isn’t working:
    • Make sure you have pip installed. You can check by running:pip --version
    • If pip isn’t installed, you can install it by downloading get-pip.py from https://bootstrap.pypa.io/get-pip.py and running:python get-pip.py
  3. Check your Python environment:
    • Ensure you’re using the correct Python version where pip is installed. Try:python -m ensurepip --upgrade python -m pip install --upgrade pip setuptools
    • If you’re using a virtual environment, activate it first before running the commands.
  4. Common issues:
    • If you get a “permission denied” error, try with sudo (Linux/Mac) or run the command prompt as administrator (Windows):sudo pip install setuptools
    • If you’re using Python 3, you might need:pip3 install setuptools

MacOS环境下VScode常用快捷键


全局
Command + Shift + P / F1 显示命令面板
Command + P 快速打开
Command + Shift + N 打开新窗口
Command + W 关闭窗口

基本
Command + X 剪切(未选中文本的情况下,剪切光标所在行)
Command + C 复制(未选中文本的情况下,复制光标所在行)
Option + Up 向上移动行
Option + Down 向下移动行
Option + Shift + Up 向上复制行
Option + Shift + Down 向下复制行
Command + Shift + K 删除行
Command + Enter 下一行插入
Command + Shift + Enter 上一行插入
Command + Shift + 跳转到匹配的括号
Command + [ 减少缩进
Command + ] 增加缩进
Home 跳转至行首
End 跳转到行尾
Command + Up 跳转至文件开头
Command + Down 跳转至文件结尾
Ctrl + PgUp 按行向上滚动
Ctrl + PgDown 按行向下滚动
Command + PgUp 按屏向上滚动
Command + PgDown 按屏向下滚动
Command + Shift + [ 折叠代码块
Command + Shift + ] 展开代码块
Command + K Command + [ 折叠全部子代码块
Command + K Command + ] 展开全部子代码块
Command + K Command + 0 折叠全部代码块
Command + K Command + J 展开全部代码块
Command + K Command + C 添加行注释
Command + K Command + U 移除行注释
Command + / 添加、移除行注释
Option + Shift + A 添加、移除块注释
Option + Z 自动换行、取消自动换行

多光标与选择
Option + 点击 插入多个光标
Command + Option + Up 向上插入光标
Command + Option + Down 向下插入光标
Command + U 撤销上一个光标操作
Option + Shift + I 在所选行的行尾插入光标
Command + I 选中当前行
Command + Shift + L 选中所有与当前选中内容相同部分
Command + F2 选中所有与当前选中单词相同的单词
Command + Ctrl + Shift + Left 折叠选中
Command + Ctrl + Shift + Right 展开选中
Alt + Shift + 拖动鼠标 选中代码块
Command + Shift + Option + Up 列选择 向上
Command + Shift + Option + Down 列选择 向下
Command + Shift + Option + Left 列选择 向左
Command + Shift + Option + Right 列选择 向右
Command + Shift + Option + PgUp 列选择 向上翻页
Command + Shift + Option + PgDown 列选择 向下翻页

查找替换
Command + F 查找
Command + Option + F 替换
Command + G 查找下一个
Command + Shift + G 查找上一个
Option + Enter 选中所有匹配项
Command + D 向下选中相同内容
Command + K Command + D 移除前一个向下选中相同内容

进阶
Ctrl + Space 打开建议
Command + Shift + Space 参数提示
Tab Emmet插件缩写补全
Option + Shift + F 格式化
Command + K Command + F 格式化选中内容
F12 跳转到声明位置
Option + F12 查看具体声明内容
Command + K F12 分屏查看具体声明内容
Command + . 快速修复
Shift + F12 显示引用
F2 重命名符号
Command + Shift + . 替换为上一个值
Command + Shift + , 替换为下一个值
Command + K Command + X 删除行尾多余空格
Command + K M 更改文件语言

导航
Command + T 显示所有符号
Ctrl + G 跳转至某行
Command + P 跳转到某个文件
Command + Shift + O 跳转到某个符号
Command + Shift + M 打开问题面板
F8 下一个错误或警告位置
Shift + F8 上一个错误或警告位置
Ctrl + Shift + Tab 编辑器历史记录
Ctrl + – 后退
Ctrl + Shift + – 前进
Ctrl + Shift + M Tab 切换焦点

编辑器管理
Command + W 关闭编辑器
Command + K F 关闭文件夹
Command + 编辑器分屏
Command + 1 切换到第一分组
Command + 2 切换到第二分组
Command + 3 切换到第三分组
Command + K Command + Left 切换到上一分组
Command + K Command + Right 切换到下一分组
Command + K Command + Shift + Left 左移编辑器
Command + K Command + Shift + Right 右移编辑器
Command + K Left 激活左侧编辑组
Command + K Right 激活右侧编辑组

文件管理
Command + N 新建文件
Command + O 打开文件
Command + S 保存文件
Command + Shift + S 另存为
Command + Option + S 全部保存
Command + W 关闭
Command + K Command + W 全部关闭
Command + Shift + T 重新打开被关闭的编辑器
Command + K Enter 保持打开
Ctrl + Tab 打开下一个
Ctrl + Shift + Tab 打开上一个
Command + K P 复制当前文件路径
Command + K R 在资源管理器中查看当前文件
Command + K O 新窗口打开当前文件

显示
Command + Ctrl + F 全屏、退出全屏
Command + Option + 1 切换编辑器分屏方式(横、竖)
Command + + 放大
Command + – 缩小
Command + B 显示、隐藏侧边栏
Command + Shift + E 显示资源管理器 或 切换焦点
Command + Shift + F 显示搜索框
Ctrl + Shift + G 显示Git面板
Command + Shift + D 显示调试面板
Command + Shift + X 显示插件面板
Command + Shift + H 全局搜索替换
Command + Shift + J 显示、隐藏高级搜索
Command + Shift + C 打开新终端
Command + Shift + U 显示输出面板
Command + Shift + V Markdown预览窗口
Command + K V 分屏显示 Markdown预览窗口

调试
F9 设置 或 取消断点
F5 开始 或 继续
F11 进入
Shift + F11 跳出
F10 跳过
Command + K Command + I 显示悬停信息

集成终端
Ctrl + 显示终端 Ctrl + Shift + 新建终端
Command + Up 向上滚动
Command + Down 向下滚动
PgUp 向上翻页
PgDown 向下翻页
Command + Home 滚动到顶部
Command + End 滚动到底部

Golang- function goroutine information .

Go by Example :Goroutines.

A gorountine is a lightweight thread of execution .

package main
import (
"fmt"
"sync"
"time"
)
func f(from string) {
for i :=0; i <4; i++ {
fmt.Println(from, ",from:", i)
}
}
func main() {
f("direct")
gof("goroutines")
gofunc(msgstring) {
fmt.Println(time.Now().Format("2006-01-02 15:04:05"), msg)
}("going--going--going")
time.Sleep(time.Second)
fmt.Println("done...")
//waitGroup.
var wg sync.WaitGroup
wg.Add(1)
gofunc() {
defer wg.Done()
fmt.Println("I'm a GoRoutines.....")
}()
wg.Wait()
fmt.Println("main func end....")
return
}

Suppose we have a function call f(s). Here’s how we’d call that in the usual way ,running it synchronously.

To invoke this function in a goroutine, use go f(s). This new goroutine will execute concurrently with the calling one.

You can also start a goroutine for an anonymous function call .

Our two function calls are running asynchronously in separate goroutines now . Wait for them to finish (for a more robust approach , use a WaitGroup).

When we run this program , we see the output of the blocking call first , then the output of the two goroutines. The goroutings’ output may be interleaved , because goroutines are being run concurrently by the Go runtime.


Docker build error

Error Message is :

`Docker build :@Err:2 http://deb.debian.org/debian-security bullseye-security InRelease Temporary failure resolving 'deb.debian.org'

这个错误通常是由于 Docker 容器在构建过程中无法解析域名,可能的原因包括 Docker 容器的网络配置问题或主机的 DNS 设置问题。以下是几种解决方法:

方法 1:检查主机网络连接

1. 确保主机能够访问 http://deb.debian.org

ping deb.debian.org

2.如果主机可以正常访问,但容器不能访问,继续以下步骤。

方法 2:配置 Docker 的 DNS

默认情况下,Docker 使用主机的 DNS 配置。如果主机的 DNS 设置有问题或被防火墙阻止,可以手动为 Docker 配置 DNS。

方法 2.1:在 docker build 中指定 DNS

docker build --network=host -t my-image .

–network=host 选项让构建过程直接使用主机的网络。

方法 2.2:通过 –dns 手动指定 DNS

在构建镜像时明确指定 DNS:

docker build --dns=8.8.8.8 --dns=8.8.4.4 -t my-image .

方法 3:更新 Docker 的全局 DNS 设置

1.编辑 Docker 的配置文件(通常在 /etc/docker/daemon.json 中):

sudo nano /etc/docker/daemon.json

2.添加或修改以下内容:

{

  "dns": ["8.8.8.8", "8.8.4.4"]

}

3.重启 Docker 服务:

sudo systemctl restart docker

方法 4:更新 Dockerfile

Dockerfile 中添加以下内容,确保在构建过程中可以使用不同的网络解析器:

RUN echo "nameserver 8.8.8.8" > /etc/resolv.conf && echo "nameserver 8.8.4.4" >> /etc/resolv.conf

方法 5:确保主机的 DNS 设置正确

1.检查主机的 DNS 配置文件 /etc/resolv.conf,内容应该类似:

nameserver 8.8.8.8

nameserver 8.8.4.4

2.如果文件为空或 DNS 服务器不可用,更新内容后保存。

方法 6:切换到其他网络模式

如果构建时网络配置出错,可以尝试使用 --network=host

docker build --network=host -t my-image .

通过上述方法,可以解决 Docker 在构建过程中因网络问题无法解析域名的问题。如果问题依然存在,请提供更多环境信息,以便进一步排查。

方法7 : 重启Docker服务

service docker status

service docker restart


close the function :ufw block print log.

要关闭 UFW 阻止日志的打印,可以通过以下步骤调整设置:

方法 1:修改 UFW 配置

1.打开 UFW 的主配置文件:

sudo nano /etc/ufw/ufw.conf

2.找到以下行并修改:

LOGLEVEL=low

改为:

LOGLEVEL=off

3.保存并退出,然后重启 UFW:

sudo ufw reload

方法 2:调整 rsyslog 配置

如果仍然出现日志,可以通过调整 rsyslog 配置来过滤掉这些日志:

1.编辑 rsyslog 配置文件:

sudo nano /etc/rsyslog.d/20-ufw.conf

2.添加以下行以过滤掉 UFW 阻止日志:

:msg, contains, "[UFW BLOCK]" ~

3.保存并重启 rsyslog 服务:

sudo systemctl restart rsyslog

方法 3:通过内核日志禁用

如果日志是由内核通过 dmesg 打印的,可以调整 sysctl 参数:

1. 添加以下行到 /etc/sysctl.conf

net.ipv4.conf.all.log_martians = 0

net.ipv4.conf.default.log_martians = 0

2.应用设置:

sudo sysctl -p

检查日志是否停止

完成上述步骤后,检查 /var/log/syslog 或其他日志文件是否仍然有相关记录。如果还有问题,可以针对具体环境进一步调整。

这样应该可以成功关闭这些日志的打印。

X86/64,x86/Geode,x86/legacy 的区别

在 ImmortalWrt 或类似的固件选项中,Generic x86/64Generic x86/GeodeGeneric x86/legacy 的区别主要涉及处理器架构和兼容性。以下是详细解释:

1. Generic x86/64

适用范围: 针对 64 位架构 的 x86 处理器(常见于现代桌面、服务器和嵌入式设备)。

特点:

•支持更大的内存地址(4GB 以上)。

•提供更高的性能优化,适用于现代 x86/64 架构(如 Intel Core 系列、AMD Ryzen 等)。

推荐使用: 如果你的设备是现代 64 位处理器,请选择此选项。

2. Generic x86/Geode

适用范围: 针对 AMD 的 Geode 系列处理器(如 Geode GX/LX 等)。

特点:

•Geode 是一类低功耗、嵌入式 x86 处理器,常用于旧式嵌入式设备或轻量化服务器。

•优化代码以适配 Geode 的特性(如有限的指令集支持)。

推荐使用: 如果你的设备是较老的嵌入式系统,并且明确使用的是 Geode 处理器,选择此选项。

3. Generic x86/legacy

适用范围: 针对旧版的 x86 处理器,通常为 32 位架构(如早期的 Intel Pentium、Celeron 或其他早期 x86 CPU)。

特点:

•没有使用 64 位特性,适合旧设备。

•优化用于处理器性能较低、内存较小的系统。

推荐使用: 如果你的设备不支持 64 位(如老式路由器、旧电脑),选择此选项。

如何选择?

1.现代设备(大多数支持 64 位): 选择 Generic x86/64

2.嵌入式或低功耗设备(明确使用 Geode 处理器): 选择 Generic x86/Geode

3. 老旧设备(32 位处理器): 选择 Generic x86/legacy

建议: 根据你的硬件特性和使用目标选择合适版本,以确保系统性能和兼容性达到最佳。

Linux TCP/UDP connection nums.

在 Linux 系统中,可以通过以下方法查看 TCP/UDP 网络连接数,并统计不同网卡的总连接数:

1. 使用 ss 命令

ss 是现代 Linux 系统中用于查看套接字统计信息的工具。

# 查看所有 TCP 连接

ss -t | wc -l

# 查看所有 UDP 连接

ss -u | wc -l

说明:

-t:显示 TCP 连接。

-u:显示 UDP 连接。

wc -l:统计行数,表示连接数。

2. 使用 netstat 命令

虽然 netstat 已被弃用,但仍然可以用来统计连接数。

# 查看所有 TCP 连接数

netstat -ant | wc -l

# 查看所有 UDP 连接数

netstat -anu | wc -l

说明:

-a:显示所有连接。

-n:数字格式显示地址和端口。

-t:显示 TCP 连接。

-u:显示 UDP 连接。

3. 按网卡统计连接数

如果需要统计每个网卡的连接数,可以结合 ss 命令和 awk 或其他工具进行筛选。例如:

# 按网卡统计 TCP 连接数

ss -t -i | grep -E "eth0|wlan0" | wc -l

# 替换网卡名称为实际名称 (如 `eth0`, `wlan0`)

4. 使用 /proc 文件系统

/proc/net/tcp /proc/net/udp 文件提供了当前 TCP 和 UDP 连接的详细信息。

# 查看 TCP 连接数

cat /proc/net/tcp | wc -l

# 查看 UDP 连接数

cat /proc/net/udp | wc -l

说明:

•减去标题行可以获得实际连接数(通常为第一行)。

5. 结合网卡信息统计

可以使用 iftopnload 等工具实时监控特定网卡的网络流量和连接数,或者结合以下命令筛选。

# 结合 IP 信息筛选网卡数据 (以 eth0 为例)

ss -t -n | grep -E "eth0" | wc -l

6. 使用 lsof 命令

lsof 也可以列出与网卡相关的连接。

# 查看 TCP 连接

lsof -iTCP | wc -l

# 查看 UDP 连接

lsof -iUDP | wc -l

如果有更复杂的需求,比如持续监控或按状态分类统计,可以使用脚本或监控工具(如 Prometheus + Grafana)实现。需要进一步深入分析吗?