fatal: detected dubious ownership in repository at direction

fatal: detected dubious ownership in repository at ‘/var/www/html/tv-web
To add an exception for this directory, call:

git config --global --add safe.directory /var/www/html/tv-web

This message from Git indicates that it detected a potential security risk due to the repository’s ownership or permissions. This can happen if the repository is owned by a different user than the one running the Git command, often when using a shared or multi-user system.

To resolve this, you can add the repository to Git’s list of safe directories, allowing Git to trust it despite the ownership mismatch. Use the following command:

git config --global --add safe.directory /var/www/html/tv-web

This will configure Git to recognize /var/www/html/tv-web as a safe directory for your current user globally on the system. After running this command, you should be able to interact with the repository without seeing this warning.

If you only want this to apply locally (without affecting the global config), you can use:

git config --add safe.directory /var/www/html/tv-web

This will limit the configuration to the repository itself rather than the global configuration.

Google Chrome headless mode and open source project

💻 Google Chrome headless mode. php

的爬虫方式是使用curl库函数去抓去静态界面抓取,所以正则匹配的时候不是整个渲染的界面,而现在的网页中,有很多的数据以及界面采用的是二次加载,前端的界面也越来越复杂,为了更好的解决这个问题,大牛们提出了不同的解决方案:

  1. 分析界面的JS请求,然后模拟。
  2. 想办法真实的模拟浏览器的请求、然后抓取Js 请求后渲染的界面。

    本文就总结了第二种方式。

注意⚠️ google的浏览器的指定版本,已经开始支持了Chrome Headless ,这导致了一些第三方的工具不去再去维护他们的项目。

1. phantomjs (已经停止开发维护)

👉 https://phantomjs.org/

Important: PhantomJS development is suspended until further notice (more details).

PhantomJS is a headless web browser scriptable with JavaScript. It runs on Windows, macOS, Linux, and FreeBSD.

Using QtWebKit as the back-end, it offers fast and native support for various web standards: DOM handling, CSS selector, JSON, Canvas, and SVG.

The following simple script for PhantomJS loads Google homepage, waits a bit, and then captures it to an image.

var page = require('webpage').create();
page.open('<http://www.google.com>', function() {
    setTimeout(function() {
        page.render('google.png');
        phantom.exit();
    }, 200);
});

PhantomJS is an optimal solution for:

Page automation

Access webpages and extract information using the standard DOM API, or with usual libraries like jQuery.

Screen capture

Programmatically capture web contents, including SVG and Canvas. Create web site screenshots with thumbnail preview.

Headless website testing

Run functional tests with frameworks such as Jasmine, QUnit, Mocha, WebDriver, etc.

Network monitoring

Monitor page loading and export as standard HAR files. Automate performance analysis using YSlow and Jenkins.

Ready to play with PhantomJS? Install and follow the Quick Start guide.

Want to learn more? Read the FAQ, explore more examples, and study the complete API documentation.

For the source code, issue tracker, and other development information, visit github.com/ariya/phantomjs.

2. Goolge Chrome/Chromium Headless CommandLine Function

1. Print DOM

google-chrome --headless --disable-gpu --no-sandbox --dump-dom  <https://www.ted.com>

你可能找不到chrome命令,根据命令行的tab 按键功能提示是否有这样的命令。或者使用ln -s 命令创建一个快捷键。 命令可能执行的会旧,等待一下即可。

2. 创建PDF

google-chrome --headless --disable-gpu --no-sandbox --dump-dom  --print-to-pdf  <https://www.ted.com>

会打印HTML字符串,并在执行命令的当前目录生成一个output.pdf文件

3. 截屏


Selenium .(目前看没有支持PHP)

The Selenium Browser Automation Project

PHP扩展

Headless Error

1. No accept header receieved on handshake response (PHP extension composer)

Need google version :

Google Chrome 110.0.5481.177

How found your chrome Version:

google-chrome --version

Install the specifical version :

wget <http://dl.google.com/linux/chrome/deb/pool/main/g/google-chrome-stable/google-chrome-stable_110.0.5481.177-1_amd64.deb>
dpkg -i google-chrome-stable_110.0.5481.177-1_amd64.deb

Limited the chrome updated :

apt-mark hold google-chrome-stable

if you want upgrade .

apt-mark unhold google-chrome-stable

【原创】如何使用我的 CloudFront 分配限制对 Amazon S3 存储桶的访问?

  1. 打开 CloudFront 控制台
  2. 从分配列表中,选择用于从要限制访问的 S3 存储桶中提供内容的分配。
  3. 选择选项卡。
  4. 选择 S3 源,然后选择 Edit(编辑)。
  5. 对于 Origin Access(来源访问),选择 Origin access control settings (recommended)(来源访问控制设置(推荐))。
  6. 对于 Origin access control(来源访问控制),选择现有 OAC,或选择 Create Control(创建控制)设置。
  7. 在对话框中,命名您的控制设置。最佳实践是保留默认设置签署请求(推荐)。然后,选择创建
  8. 对于 S3 存储桶访问,在 S3 存储桶上应用存储桶策略。选择复制策略,然后选择【保存】。
  9. 选择转至 S3 存储桶权限,将您带到 S3 存储桶控制台。
  10. 选择保存更改
  11. 在 Amazon S3 控制台中,从您的存储桶列表中,选择作为 CloudFront 分配源的存储桶。
  12. 选择权限选项卡。
  13. 在存储桶策略下,确认您看到类似于以下内容的语句:
{
    "Version": "2008-10-17",
    "Id": "PolicyForCloudFrontPrivateContent",
    "Statement": [
        {
            "Sid": "AllowCloudFrontServicePrincipal",
            "Effect": "Allow",
            "Principal": {
                "Service": "cloudfront.amazonaws.com"
            },
            "Action": "s3:GetObject",
            "Resource": "arn:aws:s3:::your_bucket_name/*",
            "Condition": {
                "StringEquals": {
                    "AWS:SourceArn": "arn:aws:cloudfront::xxxxxxxx:distribution/YYYYYYYY"
                }
            }
        }
    ]
}

Related :

  1. https://repost.aws/zh-Hans/knowledge-center/cloudfront-access-to-amazon-s3
  2. https://aws.amazon.com/pm/serv-s3

GoLang get the Client’s real IP.

🤡 注意import指定的包或者庫。

😀 一些Golang常用的快捷函數,想要寫花費一番時間,既然在PHP的編程中已經經歷了一遍,那麼就稍微總結一下

Golang 獲取客戶端真實IP

//來自github,原理大概和PHP相同
func RemoteIP(req *http.Request) string {
    remoteAddr := req.RemoteAddr
    if ip := req.Header.Get("X-Real-IP"); ip != "" {
        remoteAddr = ip
    } else if ip = req.Header.Get("X-Forwarded-For"); ip != "" {
        remoteAddr = ip
    } else {
        remoteAddr, _, _ = net.SplitHostPort(remoteAddr)
    }

    if remoteAddr == "::1" {
        remoteAddr = "127.0.0.1"
    }
    return remoteAddr
}

當初決定接觸Golang的原因是想了解一些Golang的編程方式,發現也有指針,就寫了一個Web的應用程式。

Ip2long 将 IPv4 字符串形式转为 uint32

func Ip2long(ipstr string) uint32 {
    ip := net.ParseIP(ipstr)
    if ip == nil {
        return 0
    }
    ip = ip.To4()
    return binary.BigEndian.Uint32(ip)
}

fatal: unable to access git url:Recv failure: Connection reset by peer.

😀 fatal: unable to access ‘github url ‘: Recv failure: Connection reset by peer

網絡解決方案:

git error

👉 New error: could not lock config file /home/ubuntu/.gitconfig: Permission denied

Hi,Hi ,it is not working ..

最終發現使用curl 命令請求該git url的時候,出現:

curl: (56) Recv failure: Connection reset by peer

查看git url的主機,發現請求到了giturl所在的服務器,但是顯示的是nginx的http code :499

以前一直是正常的,但是最近出现的问题,检查了服务器端,目前并没有变化的配置,各种参数修改,发现并不行、由于Git服务器放在公司,通过域名供应商的ddns映射到公司的内网服务器上,我看有的用户反馈是ISP可能阻断这种gitcurlwgethttp/https的请求,那如果真的是这种情况,就只能使用ssh协议进行clone代码了。

如下的文章:

Nginx状态码499-错误分析

大家抄來抄去的,餅不符合所有的人。

我的问题是出现在阿里云的服务器上,比如:HongKong,华南的Linux服务器,在使用curlwgetgit请求git仓库的时候,发现都是Connection reset by peer

无奈,只能问阿里云的工程师。

Wireguard 部署安裝

WireGuard是一款开源的VPN协议软件,基于Linux的内核实现,利用Curve25519进行密钥交换,ChaCha20用于加密,Poly1305用于数据认证,BLAKE2用于散列函数运算,支持IPv4IPv6的第3层。其配置简单并且比较安全再业界还是比较有名的,相比较OpenVPN和IPsec的配置,WireGuard绝对优于它们N个数量级,并且,你只需要配置通过一次,就基本知道WireGuard的调试方式,和其他VPN协议一样,WireGuard也获得了不同平台的支持。

📝 WireGuard的安裝部署測試

基礎環境

Ubuntu 系统(Client) &mac 系统(Client)& Openwrt(Client软路由)

安装基础软件

  1. Linux平台(Server端)
    sudo apt update
    sudo apt install wireguard-tools
  2. Mac系统 (Client端)
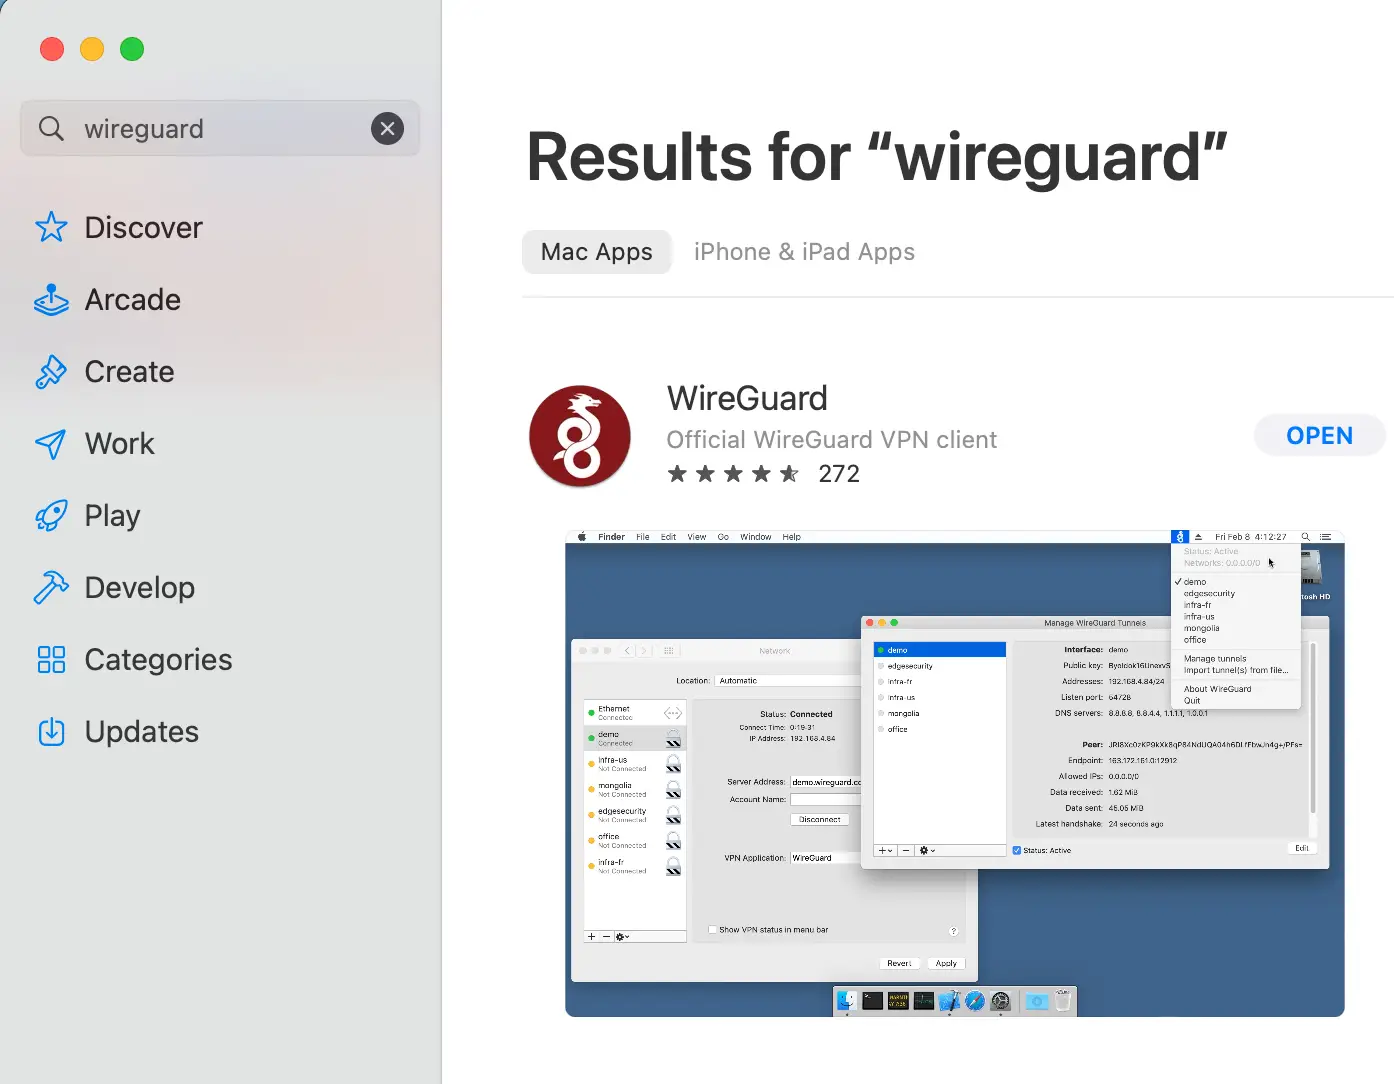
    Mac系统,需要Mac软件商城中下载(如下图),需要一个美区账号
    下载链接(<https://apps.apple.com/us/app/wireguard/id1451685025?mt=12)>


    macOS Wireguard

注意⚠️:安装该软件包,常用的命令是 wg,wg-quick 命令,而 **wg**命令会有一些子命令。

生成privateKey/PublicKey

使用wg命令生成密鑰對,命令如下.(privateKey/PublicKey,只要有wg命令即可,不需要注意在Ubuntu或者Mac或者Openwrt平台)

1. 服務端密鑰生成命令:

wg genkey | tee privatekey | wg pubkey > publickey && cat privatekey && cat publickey

aGNR226kQ6ZvrCWvQSQM4OvbleHFaqE+TqDWPvlJNmY=
NVkY/I9sdgecmGonzwuythV+lef9b8z5RmG3G72Ys04=

2. 客戶端生成密鑰命令:

    
    wg genkey | tee privatekey | wg pubkey > publickey && cat privatekey && cat publickey
    
    2PFXXGUmy2oNFTvp7UtoCqxgAVCd82j0tNwdD0s1lGQ=
    6srCFfbQvk97wSoP1/oT/UlLCwxtpG6rutVou6d9njc=
    

    注意⚠️:上面一行是privateKey,下面一行是PublicKey

    Ubuntu服務器端的配置

    如果客戶端還想上網,那麼就需要開啟Ip4的轉發了,Linux中開啟轉發的配置,需要在文件cat /etc/sysctl.conf中添加:

    net.ipv4.conf.all.forwarding = 1 
    net.ipv4.conf.default.forwarding = 1 
    net.ipv4.conf.all.rp_filter = 0 
    net.ipv4.conf.default.rp_filter = 0 
    net.ipv4.ip_forward = 1
    

    立即生效,需要執行命令:

    sudo sysctl -p
    

    wireguard的配置文件目錄是/etc/wireguard/, 文件名字格式一般是xx.conf,內容使用INI的文件格式

    下面寫了一個配置文件,文件名稱為/etc/wireguard/wg0.conf

    [Interface] 
    ListenPort = 51821 
    PrivateKey = aGNR226kQ6ZvrCWvQSQM4OvbleHFaqE+TqDWPvlJNmY=
    Address = 10.0.0.1/30 
    MTU = 1380 
    Table = 101 
    #客戶端配置
    [Peer] 
    PublicKey = 6srCFfbQvk97wSoP1/oT/UlLCwxtpG6rutVou6d9njc=
    #如果是服務器端,這裡的Endpoint可以不用設置
    #Endpoint = *IP*:51821 
    AllowedIPs = 0.0.0.0/0 
    PersistentKeepalive = 10
    

    上述配置文件完成以後,就代表了wg-quick命令啟動的時候,wireguard在系統內會啟動一個虛擬網卡名為wg0。如果你想設置為別的名字,可以修改該配置文件名稱。

    ⚠️請確認上述配置的ListenPort的端口,已經在防火牆中放行!!!

    啟動wireguard

    sudo wg-quick up wg0

    關閉wireguard

    sudo wg-quick down wg0

    查看是否已經啟動

    sudo wg

    查看配置

    sudo wg showconf

    查看wg支持的所有的命令:

    sudo wg help

    Usage: wg <cmd> [<args>]
    
    Available subcommands:
      show: Shows the current configuration and device information
      showconf: Shows the current configuration of a given WireGuard interface, for use with `setconf'
      set: Change the current configuration, add peers, remove peers, or change peers
      setconf: Applies a configuration file to a WireGuard interface
      addconf: Appends a configuration file to a WireGuard interface
      syncconf: Synchronizes a configuration file to a WireGuard interface
      genkey: Generates a new private key and writes it to stdout
      genpsk: Generates a new preshared key and writes it to stdout
      pubkey: Reads a private key from stdin and writes a public key to stdout
    You may pass `--help' to any of these subcommands to view usage.
    

    MacOS 配置wireGuard配置

    直接打卡MacOS安裝好的WireGuard客戶端,新建一個新的Tunnel,編輯,配置如下:

    [Interface]
    PrivateKey = 2PFXXGUmy2oNFTvp7UtoCqxgAVCd82j0tNwdD0s1lGQ=
    ListenPort = 51820
    Address = 10.1.1.1/24
    DNS = 8.8.8.8, 114.114.114.114, 233.5.5.5
    MTU = 1380
    
    [Peer]
    PublicKey = NVkY/I9sdgecmGonzwuythV+lef9b8z5RmG3G72Ys04=
    AllowedIPs = 0.0.0.0/0
    # 這裡,就必須配置Endpoint了、不然客戶端找不到服務器
    Endpoint = 服務器端IP:51821 
    PersistentKeepalive = 10
    

    點擊連結就會看到WireGuard與服務器端的握手信息了。

    相比較OpenWrt,macOSWireGuard的配置就很簡單了

    OpenWrt 配置wireGuard上網

    持續更新中..

    🤗 總結

    wireguard想比較別的VPN的配置,簡單了很多,在組網的過程中,真的是一個很推薦的選擇,在客戶端的選擇上,WireGuard的支持也比較豐富,就是在大陸境內的wireGuard的客戶端選擇上,並不怎麼豐富,此WireGuard的管理界面在iKuai等一些特殊的版本才會有。不管怎麼樣,如果喜歡折騰命令行的話,wireGuard大概是一個不錯的選擇

    📎 参考文章

    • WireGuard官网

    💡 有关WireGuard安装或者使用上的问题,欢迎您在底部评论区留言,一起交流~

    Golang:http: panic serving [::1]:60007: runtime error: invalid memory address or nil pointer dereference

    Error message as below:

    🤡 http: panic serving [::1]:60007: runtime error: invalid memory address or nil pointer dereference

    運行golang項目的時候,出現的問題,逐步排查吧,真的沒有辦法,我使用的是spew.Dump()函數打印的,最終找到了問題的梭子啊,排查的子問題如下:

    Session err :session err : securecookie: the value is not valid 2023/08/10 17:55:51 securecookie: the value is not valid exit status 1

    最近維護舊系統,在使用Golang的http服務處理用戶的請求的時候發現本地cookie有點問題,提示如上,

    想起來在保存本地的調試環境是localhost:8080,在保存cookieName的時候,想著添加一個host作為後綴,結果出現了上述的後綴,於是處理了host,代碼如下:

    host := request.Host //Caddy要传递相关参数.
        hostBoolean :=  strings.Contains(host,":")
        if hostBoolean {
            hostHeader := strings.Split(host, ":")[0]
            spew.Dump(host)
            port := strings.Split(host, ":")[1]
            spew.Dump(port)
            host =  hostHeader + port
            spew.Dump(host)
        }
    

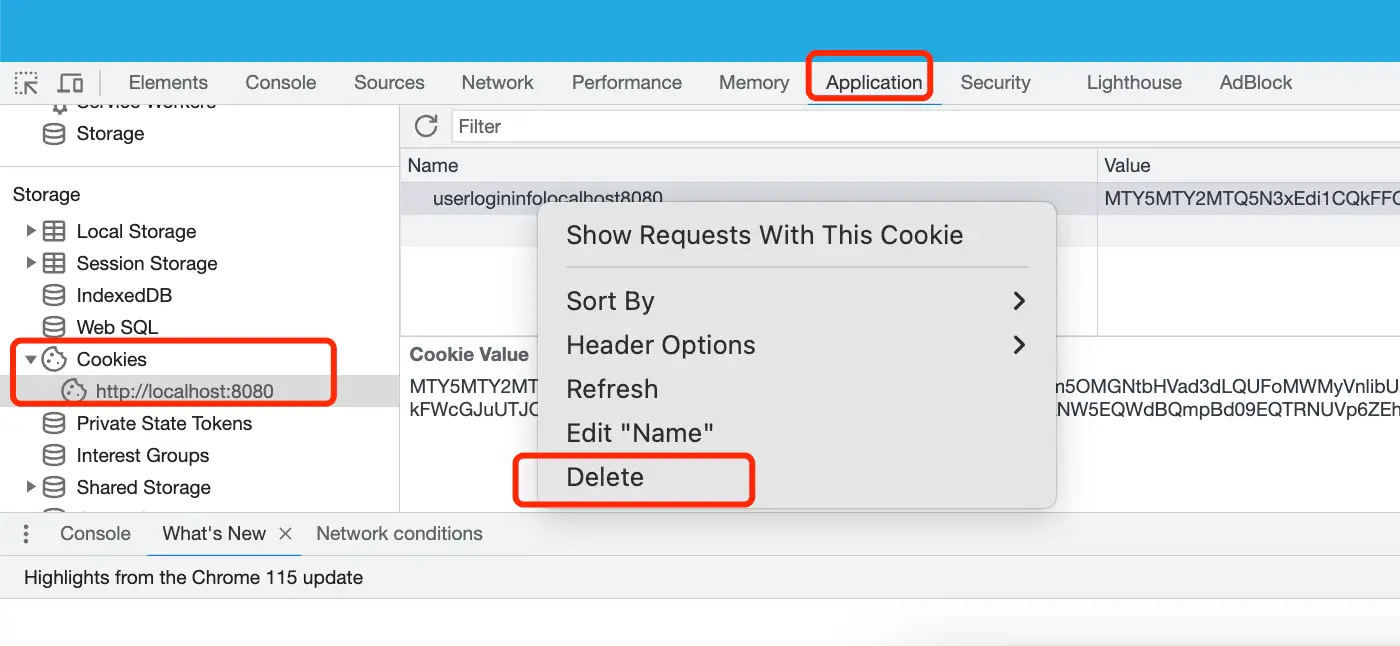
    但是在增加了上述的信息以後,還是在getCookie的時候,出現上面的問題,突然想到瀏覽器本地的cookie緩存(開發者模式)

    golang panci

    如圖,在找到該地方的內容以後,刪除即可。重新再請求,就沒有這個問題了


    JavaScript Promise 回調地獄的解決方案

    Promise對象的三種狀態

    1. pending 進行中
    2. fulfilled :已經成功
    3. rejected :已失敗

    只有異步操作的結果,可以決定當前是哪一種狀態,任何其他的操作都無法改變這個狀態。

    Promise 的特點

    1. 對象的狀態不受外界的影響。三種狀體,取決於異部操作的結果,然後決定了哪種狀態。
    2. 一旦状态改变,就不会再变,任何时候都可以得到这个结果。Promise 对象的状态改变,只有两种可能:从Pending 变成fulfilled和从Pendingrejected。只要这两种情况发生了,状态就不会再变了,一直保持这个结果,也就是成为resolved

    參考文檔

    Nodejs 之promise对象详解nodejs promise去宇宙给你摘星的博客-CSDN博客

    IP-广播IP

    什么是广播IP?广播IP是不是不好?

    广播IP是一种技术手段,是云服务器运营商将其拥有IP地址段分配到服务器所在地的一种方式,因此广播IP的运营商所在国家和服务器的地理位置可以不一致。比如香港的运营商把其IP地址段广播到新加坡、菲律宾、印尼等地。广播IP的价格非常亲民,可以获得和原生IP一致的网络体验。广播IP和原生IP相比并没有好坏之分,还是要看用户具体需求和使用场景。

    MYSQL error (appending)

    1. not allow grant (mysql 8.x)

    You are not allowed to create a user with GRANT

    MYSQL8.0版本中,grant 命令已經做了一些限制,需要增加子用戶。

    2. create user with ‘localhost’ limited.

    create user 'username'@'localhost' identified by 'your password';
    ERROR 1227 (42000): Access denied; you need (at least one of) the SYSTEM_USER privilege(s) for this operation

    3. first install the mysql-server ‘s log

    after you installed the my-server(8.0) ,the /var/log/mysql/error.log ‘s content as below :

    
    2024-06-01T10:47:53.303275Z 0 [System] [MY-013169] [Server] /usr/sbin/mysqld (mysqld 8.0.36-0ubuntu0.22.04.1) initializing of server in progress as process 2524495
    2024-06-01T10:47:53.308841Z 1 [System] [MY-013576] [InnoDB] InnoDB initialization has started.
    2024-06-01T10:47:53.621206Z 1 [System] [MY-013577] [InnoDB] InnoDB initialization has ended.
    2024-06-01T10:47:55.308728Z 6 [Warning] [MY-010453] [Server] root@localhost is created with an empty password ! Please consider switching off the --initialize-insecure option.
    2024-06-01T10:47:56.361302Z 6 [System] [MY-013172] [Server] Received SHUTDOWN from user boot. Shutting down mysqld (Version: 8.0.36-0ubuntu0.22.04.1).
    2024-06-01T10:47:59.702238Z 0 [System] [MY-010116] [Server] /usr/sbin/mysqld (mysqld 8.0.36-0ubuntu0.22.04.1) starting as process 2524540
    2024-06-01T10:47:59.723628Z 1 [System] [MY-013576] [InnoDB] InnoDB initialization has started.
    2024-06-01T10:47:59.959131Z 1 [System] [MY-013577] [InnoDB] InnoDB initialization has ended.
    2024-06-01T10:48:00.209342Z 0 [Warning] [MY-010068] [Server] CA certificate ca.pem is self signed.
    2024-06-01T10:48:00.209368Z 0 [System] [MY-013602] [Server] Channel mysql_main configured to support TLS. Encrypted connections are now supported for this channel.
    2024-06-01T10:48:00.213346Z 0 [Warning] [MY-011810] [Server] Insecure configuration for --pid-file: Location '/tmp' in the path is accessible to all OS users. Consider choosing a different directory.
    2024-06-01T10:48:00.239500Z 0 [System] [MY-011323] [Server] X Plugin ready for connections. Socket: /var/run/mysqld/mysqlx.sock
    2024-06-01T10:48:00.239617Z 0 [System] [MY-010931] [Server] /usr/sbin/mysqld: ready for connections. Version: '8.0.36-0ubuntu0.22.04.1'  socket: '/tmp/tmp.x2knLvB42L/mysqld.sock'  port: 0  (Ubuntu).
    2024-06-01T10:48:00.280022Z 0 [System] [MY-013172] [Server] Received SHUTDOWN from user <via user signal>. Shutting down mysqld (Version: 8.0.36-0ubuntu0.22.04.1).
    2024-06-01T10:48:01.727897Z 0 [System] [MY-010910] [Server] /usr/sbin/mysqld: Shutdown complete (mysqld 8.0.36-0ubuntu0.22.04.1)  (Ubuntu).
    2024-06-01T10:48:02.636676Z 0 [System] [MY-010116] [Server] /usr/sbin/mysqld (mysqld 8.0.36-0ubuntu0.22.04.1) starting as process 2524609
    2024-06-01T10:48:02.643704Z 1 [System] [MY-013576] [InnoDB] InnoDB initialization has started.
    2024-06-01T10:48:02.832343Z 1 [System] [MY-013577] [InnoDB] InnoDB initialization has ended.
    2024-06-01T10:48:03.028042Z 0 [Warning] [MY-010068] [Server] CA certificate ca.pem is self signed.
    2024-06-01T10:48:03.028072Z 0 [System] [MY-013602] [Server] Channel mysql_main configured to support TLS. Encrypted connections are now supported for this channel.
    2024-06-01T10:48:03.032569Z 0 [Warning] [MY-011810] [Server] Insecure configuration for --pid-file: Location '/tmp' in the path is accessible to all OS users. Consider choosing a different directory.
    2024-06-01T10:48:03.051732Z 7 [System] [MY-013172] [Server] Received SHUTDOWN from user boot. Shutting down mysqld (Version: 8.0.36-0ubuntu0.22.04.1).
    2024-06-01T10:48:03.057668Z 0 [System] [MY-011323] [Server] X Plugin ready for connections. Bind-address: '127.0.0.1' port: 33060, socket: /var/run/mysqld/mysqlx.sock
    2024-06-01T10:48:04.552078Z 0 [System] [MY-010910] [Server] /usr/sbin/mysqld: Shutdown complete (mysqld 8.0.36-0ubuntu0.22.04.1)  (Ubuntu).
    

    about the ‘—initialize-insecure’ introduction document link is Here.

    https://dev.mysql.com/doc/refman/8.0/en/server-options.html#option_mysqld_initialize-insecure

    if you want use the mysqld —initialize command to generate mysql database password, you may get the error in the /var/log/mysql/error.log :

    [Server] --initialize specified but the data directory has files in it. Aborting.

    so ,you must delete the data of the mysql data dir /var/lib/mysql

    then exec the command :

    mysqld —initialize

    then you can get the mysql password in the log (/var/log/mysql/error.log);

    2024-11-09T08:08:18.311176Z 6 [Note] [MY-010454] [Server] A temporary password is generated for root@localhost: /nuepoLfZ3=q

    then start the mysql :

    sudo service mysql restart 

    or

    /etc/init.d/mysql start 

    use the random password login mysql .

    when you exec the mysql command in mysql line mode, you will get the error :

    mysql> show databases;
    ERROR 1820 (HY000): You must reset your password using ALTER USER statement before executing this statement.

    try to use ‘alter user [root@localhost](<mailto:root@localhost>) identified by 'your new password' ’ to set the root ‘s password.

    4. can’t create lock file /var/run/mysqld/mysqlx.sock.lock’

    [ERROR] [MY-011300] [Server] Plugin mysqlx reported: 'Setup of socket: '/var/run/mysqld/mysqlx.sock' failed, can't create lock file /var/run/mysqld/mysqlx.sock.lock'

    不能夠創建myqlx.sock.lock文件:

    A message intended for a client cannot be sent there as no client-session is attached. Therefore, we’re sending the information to the error-log instead: MY-000029 – File ‘/usr/local/src/mysql_init‘ not found (OS errno 13 – Permission denied)

    5. MSYQL reset root password

    On Unix, use the following procedure to reset the password for the MySQL 'root'@'localhost' account. To change the password for a root account with a different host name part, modify the instructions to use that host name.

    The instructions assume that you start the MySQL server from the Unix login account that you normally use for running it. For example, if you run the server using the mysql login account, you should log in as mysql before using the instructions. Alternatively, you can log in as root, but in this case you must start mysqld with the --user=mysql option. If you start the server as root without using --user=mysql, the server may create root-owned files in the data directory, such as log files, and these may cause permission-related problems for future server startups. If that happens, you must either change the ownership of the files to mysql or remove them.

    1. Log on to your system as the Unix user that the MySQL server runs as (for example, mysql).
    2. Stop the MySQL server if it is running. Locate the .pid file that contains the server’s process ID. The exact location and name of this file depend on your distribution, host name, and configuration. Common locations are /var/lib/mysql//var/run/mysqld/, and /usr/local/mysql/data/. Generally, the file name has an extension of .pid and begins with either mysqld or your system’s host name. Stop the MySQL server by sending a normal kill (not kill -9) to the mysqld process. Use the actual path name of the .pid file in the following command:

    $> kill cat /mysql-data-directory/host_name.pid“ Use backticks (not forward quotation marks) with the cat command. These cause the output of cat to be substituted into the kill command. 3. Create a text file containing the password-assignment statement on a single line. Replace the password with the password that you want to use.

    ALTER USER 'root'@'localhost' IDENTIFIED BY 'MyNewPass'; 4. Save the file. This example assumes that you name the file /home/me/mysql-init. The file contains the password, so do not save it where it can be read by other users. If you are not logged in as mysql (the user the server runs as), make sure that the file has permissions that permit mysql to read it. 5. Start the MySQL server with the init_file system variable set to name the file:

    $> mysqld --init-file=/home/me/mysql-init & The server executes the contents of the file named by the init_file system variable at startup, changing the 'root'@'localhost' account password. Other options may be necessary as well, depending on how you normally start your server. For example, --defaults-file may be needed before the init_file argument. 6. After the server has started successfully, delete /home/me/mysql-init.

    You should now be able to connect to the MySQL server as root using the new password. Stop the server and restart it normally.

    MySQL :: MySQL 8.0 Reference Manual :: B.3.3.2 How to Reset the Root Password

    6. exec mysqld —init-file=/home/ubuntu/mysql_init

    the error log is :

    2024-06-02T04:26:29.419188Z 0 [System] [MY-010910] [Server] /usr/sbin/mysqld: Shutdown complete (mysqld 8.0.36-0ubuntu0.22.04.1)  (Ubuntu).
    2024-06-02T04:28:01.567754Z 0 [System] [MY-010116] [Server] /usr/sbin/mysqld (mysqld 8.0.36-0ubuntu0.22.04.1) starting as process 28222
    2024-06-02T04:28:01.574355Z 1 [ERROR] [MY-011011] [Server] Failed to find valid data directory.
    2024-06-02T04:28:01.574414Z 0 [ERROR] [MY-010020] [Server] Data Dictionary initialization failed.
    2024-06-02T04:28:01.574423Z 0 [ERROR] [MY-010119] [Server] Aborting
    2024-06-02T04:28:01.574754Z 0 [System] [MY-010910] [Server] /usr/sbin/mysqld: Shutdown complete (mysqld 8.0.36-0ubuntu0.22.04.1)  (Ubuntu).
    

    I delete all files of the dir /var/lib/mysql .

    7. Mysql Server for Mac M1

    start the mysql server .

    You can go to the system settings . There is a MYSQL icon on the left side ,then click the Item. you will get the UI.

    click the button 【Start MySQL Server 】 then Mysql will start .

    When you use the brew start the MYSQL Server.

    brew services start mysql 

    then you will get the result .

    Warning: Taking root:admin ownership of some mysql paths:
      /opt/homebrew/Cellar/mysql/8.3.0_1/bin
      /opt/homebrew/Cellar/mysql/8.3.0_1/bin/mysqld_safe
      /opt/homebrew/opt/mysql
      /opt/homebrew/opt/mysql/bin
      /opt/homebrew/var/homebrew/linked/mysql
    This will require manual removal of these paths using `sudo rm` on
    brew upgrade/reinstall/uninstall.
    Warning: mysql must be run as non-root to start at user login!
    ==> Successfully started `mysql` (label: homebrew.mxcl.mysql)

    Then try connect the mysql Server .

    ubuntu@hostname_mac Downloads % mysql -uroot -p
    Enter password:
    ERROR 2002 (HY000): Can't connect to local MySQL server through socket '/tmp/mysql.sock' (2)
    

    The MYSQL Server doesn’t start .